
In many projects, users have to enter information into multiple related fields manually. This not only takes time but can also lead to inconsistent data, especially when working with bookings, events, or products. Instead of entering everything manually on the back end, we’ll make the system auto-populate related fields from a main field.
For example, when managing hundreds or even thousands of products, you can automatically generate a unique product code based on category and post ID. This helps standardize product data and avoid duplicate values.
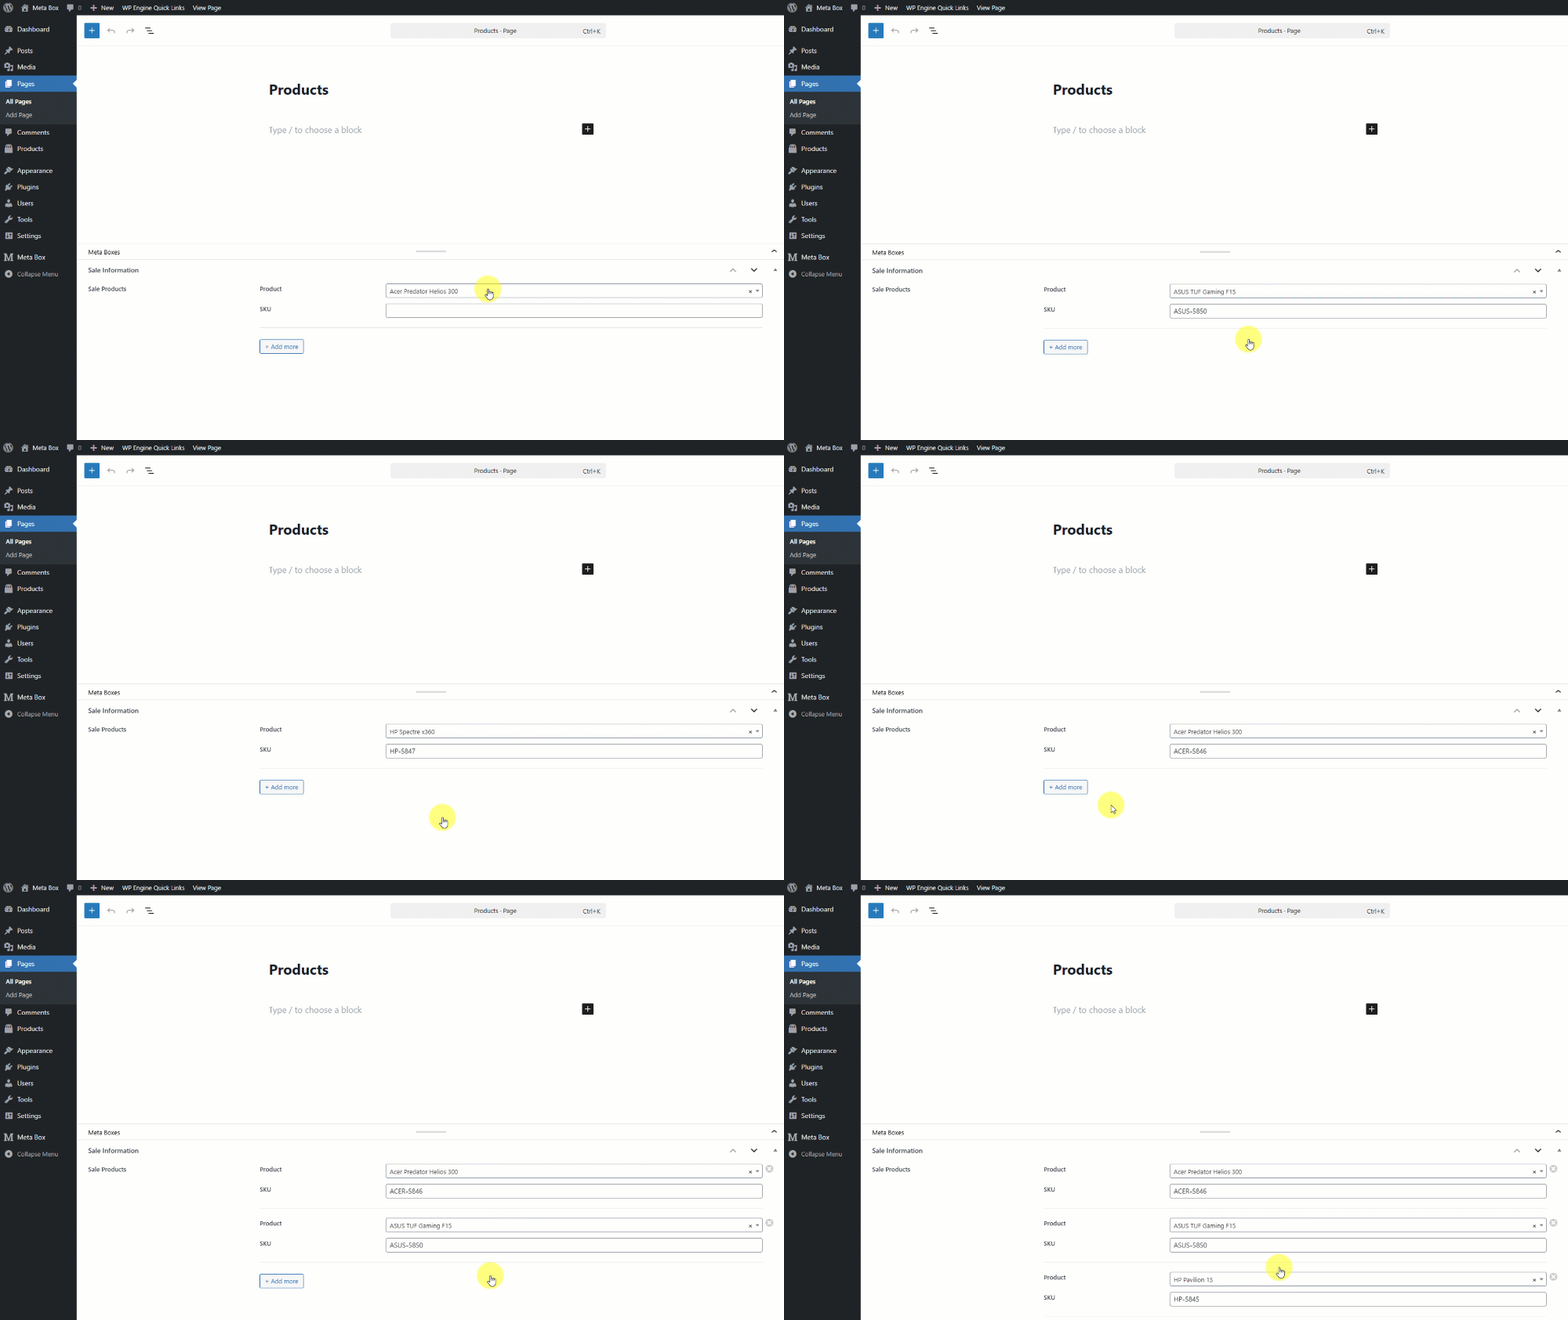
Let’s start now!
Video Verson

Before Getting Started
For this practice, we only need the free version - Meta Box Lite, to have the framework and some essential extensions. If you’re using Meta Box AIO, everything is already included, including all advanced features and extensions. Here are some extensions:
- MB Custom Post Type: to create a Product custom post type, and also a taxonomy to store product brands;
- MB Builder: to create custom fields for the product data;
- MB Group: to organize related fields into structured sections for better data management.
Before going into the detailed steps, I’ve already prepared some sample data for this demo.

We have a Product custom post type with several products added. Each product has already been assigned to a corresponding Brand taxonomy, as you can see in the Brands column.
Now, we’ll move on to the next step: creating custom fields to store additional product data for each product.
Create Custom Fields
First, go to Meta Box > Custom Fields to create a field group for the product information.

Here, I’ve already created a Group field with two subfields inside. One is for the Product Name. This Post field type allows you to select a product from the created post type. The other is for the SKU, which represents the product code.
You can add as many fields as needed to store product data. However, in this example, I only use these two fields to keep it simple.
The idea is that when you select a product name in the backend, the SKU field will be automatically populated with the corresponding value instead of entering it manually.
We make this group field cloneable to add as many products as you want.

And of course, don’t forget to set the location rule for this field group. In this practice, I set it to the Product Page.
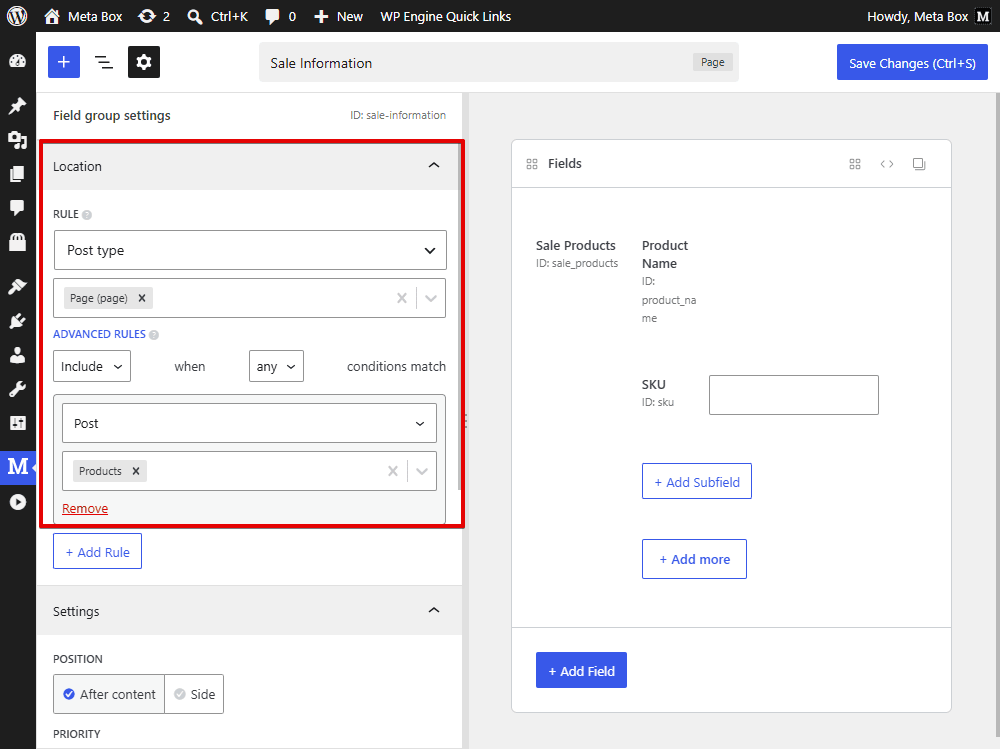
Now, in the page editor, you will see the created fields.

You just need to fill in the product information. However, at this stage, the product code is not automatically filled yet. Move to the most important step.
As I mentioned earlier, the goal here is to automatically display the SKU value when we select a product in the Product Name field.
Now, we’ll add some code to the theme file editor to handle this automation.

add_action( 'wp_ajax_get_product_sku_data', function () {
        $post_id = intval( $_POST['post_id'] ?? 0 );
        if ( ! $post_id ) wp_send_json_error();
    $terms = get_the_terms( $post_id, 'brand' );
    $brand = '';
        if ( ! empty( $terms ) && ! is_wp_error( $terms ) ) {
       $brand = strtoupper( $terms[0]->name );
    }
        $sku = $brand . '-' . $post_id;
    wp_send_json_success( [ 'sku' => $sku ] );
});

add_action( 'admin_footer', function () {
?>
<script>
jQuery(function($){
        function updateSKU($row) {
    let productId = $row.find('[name*="[product]"]').val();
    if (!productId) return;
    $.post(ajaxurl, {
        action: 'get_product_sku_data',
        post_id: productId
    }, function(res){
        if (res.success) {
            $row.find('[name*="[sku]"]').val(res.data.sku);
        }
    });
}
            $(document).on('change', '[name*="[product]"]', function(){
        let $row = $(this).closest('.rwmb-group-clone');
        updateSKU($row);
    });
});
</script>
<?php
});

add_action( 'rwmb_after_save_post', function( $post_id ) {
        $groups = rwmb_meta( 'sale_products', [], $post_id );
    if ( empty( $groups ) ) return;
        foreach ( $groups as $i => $group ) {
    if ( empty( $group['product'] ) ) continue;
    $product_id = $group['product'];
    $terms = get_the_terms( $product_id, 'brand' );
    $brand = '';
    if ( ! empty( $terms ) && ! is_wp_error( $terms ) ) {
        $brand = strtoupper( $terms[0]->name );
    }

        $groups[$i]['sku'] = $brand . '-' . $product_id;
    }
    update_post_meta( $post_id, 'sale_products', $groups );
});
Explanation:
add_action( 'wp_ajax_get_product_sku_data', function () {
We register an AJAX action in WordPress that works only for logged-in users in the admin area.
$post_id = intval( $_POST['post_id'] ?? 0 );
This code is to retrieve the post ID from the AJAX request and set it to 0 if no value is provided.
When no product is selected, the process stops immediately to avoid running unnecessary code.
if ( ! $post_id ) wp_send_json_error();
This code bellow is to retrieve the terms of the “brand” taxonomy associated with the given product post ID.
$terms = get_the_terms( $post_id, 'brand' );
And then, we check whether the product has any brand terms, and if so, it retrieves the first term by using this code.
if ( ! empty( $terms ) && ! is_wp_error( $terms ) ) {
$brand = strtoupper( $terms[0]->name );
}
The following code is to generate the SKU by combining the brand name with the product post ID in this format.
$sku = $brand . '-' . $post_id;
Then, it sends the generated data back to JavaScript in JSON format as a successful AJAX response.
wp_send_json_success( [ 'sku' => $sku ] );
This hooks into the WordPress admin footer to output JavaScript that runs only in the backend without affecting the frontend.
add_action( 'admin_footer', function () {
From there, this part below detects when a product is selected in a cloned field group. When the value changes, it identifies the correct row, sends a request to get product code data, and fills the S K U field in that row automatically. It works dynamically for each clone, so every row is handled independently without affecting others.
function updateSKU($row) {
    let productId = $row.find('[name*="[product]"]').val();
    if (!productId) return;
    $.post(ajaxurl, {
        action: 'get_product_sku_data',
        post_id: productId
    }, function(res){
        if (res.success) {
        $row.find('[name*="[sku]"]').val(res.data.sku);
        }
    });
}
On product change, it gets the current clone and calls a function to update the product code.
$(document).on('change', '[name*="[product]"]', function(){
    let $row = $(this).closest('.rwmb-group-clone');
    updateSKU($row);
});
After that, the Meta Box hook runs after a post is saved.
add_action( 'rwmb_after_save_post', function( $post_id ) {
And this one retrieves all group data and stops if the field is empty.
$groups = rwmb_meta( 'sale_products', [], $post_id );
if ( empty( $groups ) ) return;
At this point, loop through each group, get the product inside it, retrieve the product’s brand, then generate an SKU by combining the brand and product ID, and save it back into the group.
$product_id = $group['product'];
$terms = get_the_terms( $product_id, 'brand' );
$brand = '';
if ( ! empty( $terms ) && ! is_wp_error( $terms ) ) {
    $brand = strtoupper( $terms[0]->name );
}
$groups[$i]['sku'] = $brand . '-' . $product_id;
Finally, it updates the entire cloned group with the modified data.
update_post_meta( $post_id, 'sale_products', $groups );
Now, when you return to the product page editor, selecting any product instantly updates the SKU. Everything works smoothly as expected.
Last words
Auto-populating related fields helps reduce manual work, improve data consistency, and speed up content management. With Meta Box, you can easily adapt this technique to automate many other fields in your projects.
Looking for more ways to streamline data entry? Check out our guide on working with cloneable Group fields.

 How to Add Custom Fields to Products in WooCommerce - Using Meta Box and Bricks
  How to Import Meta Box Custom Fields - Using WP All Import
  How to Display Author Bio in WordPress - P1 - Using Meta Box and Bricks