
When you want to collect customer feedback on your products, new features, or overall satisfaction without complicated forms, you can add a real-time voting poll to your site to check the results immediately. It is an easy task with the help of MB Views from Meta Box.
This is a demonstration:
When a visitor clicks on an option to vote, the result will be updated instantly without reloading. You can also see the results in votes and percentages. In addition, options automatically reorder from the highest to the lowest vote count.
Real-time voting can be incredibly useful and engaging in many real-world scenarios. Besides collecting customer feedback, it’s also great for contests and online events, where people can vote for their favorite contestants and see the results update live on the page.
Before going ahead, let’s check some tools we need for this practice.
Video Version

Before Getting Started
We’ll display voting poll data on a settings page. The details are stored in custom fields created with Meta Box. Each option includes the label and number of votes. So, we’ll use a cloneable group for them. Then, use MB Views to display the data in poll format. So, we highly recommend you use Meta Box AIO to have both the framework and all the advanced features from Meta Box extensions, especially:
- MB Settings Page: to create a settings page for the poll.
- MB Builder: to have a UI in the backend to create custom fields visually.
- MB Group: to organize custom fields into groups for better management.
- MB Views: to create a view for displaying and adding actions for the poll.
Now, let’s build the live voting poll step by step.
Create a Settings Page and Custom Fields
You can follow previous tutorials on how to create a settings page and custom fields step by step for more details. I have created them already.
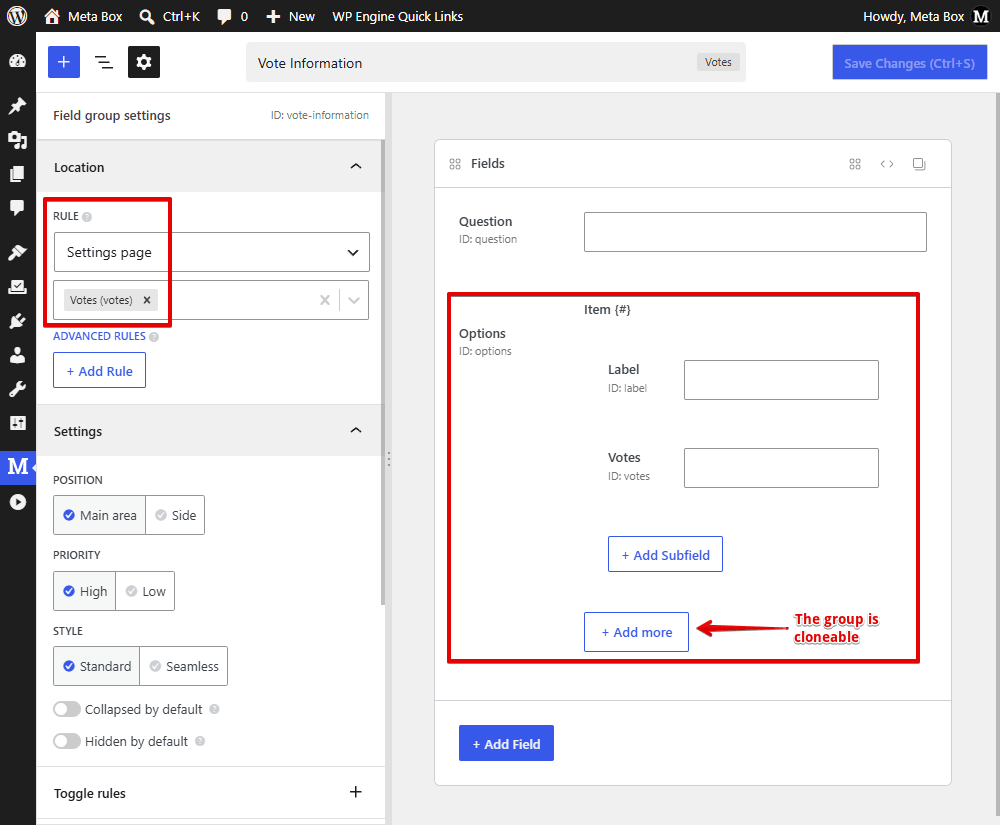
Since a poll has more than one choice, I made the group of options cloneable. Don’t forget to assign this field group to the created settings page.
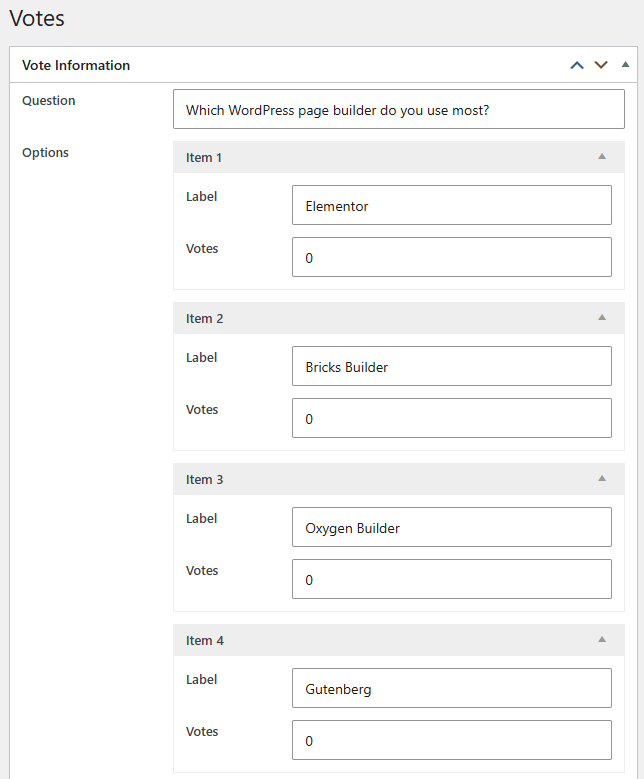
After that, go to the settings page; you can see the custom fields and input data for them. The votes for all options are zero at the beginning.
Now, let’s move to the key part of this tutorial.
Build a Live Voting Poll
We’ll do it with MB Views. Go to Meta Box > Views, and create a new view.
Get and Display Options on Frontend
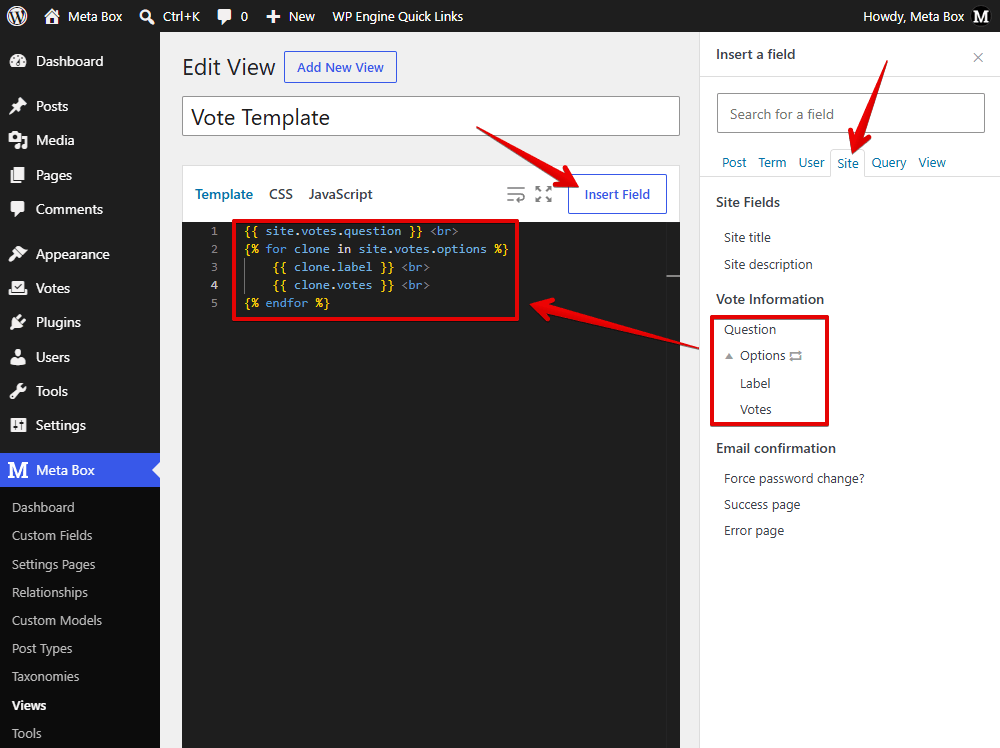
In the template tab, you can add code directly, but it’s more convenient if you use the Insert Field button to insert fields you want to get data from the list. Since we stored custom fields in the settings page, navigate to the Site tab, and click on the field group. The options are stored in a cloneable group, so when you click on it, a loop is generated in the template tab. Inside this loop, simply insert subfields.
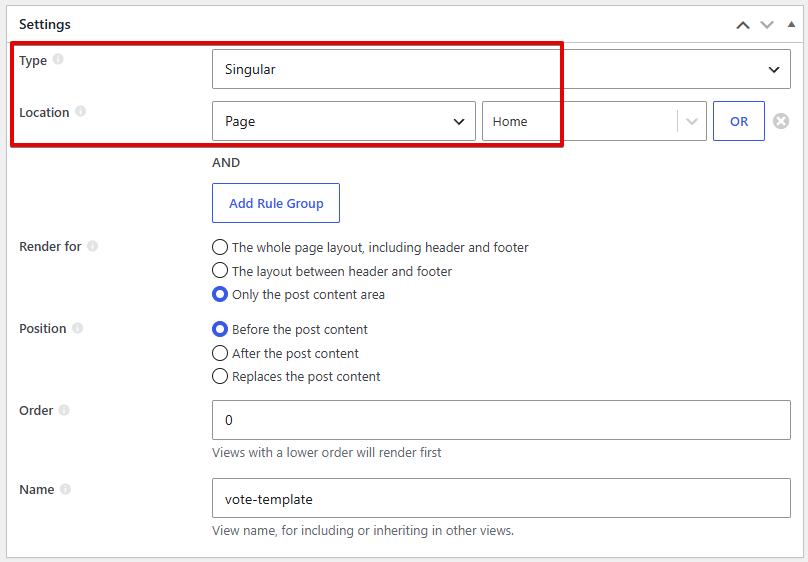
I’ll show the voting poll on the homepage, so in the Settings section, set the location like this.
On the frontend, you can see that the data is retrieved and displayed fully.
Transform Data to Poll Format
Go back to the created template to add some code.
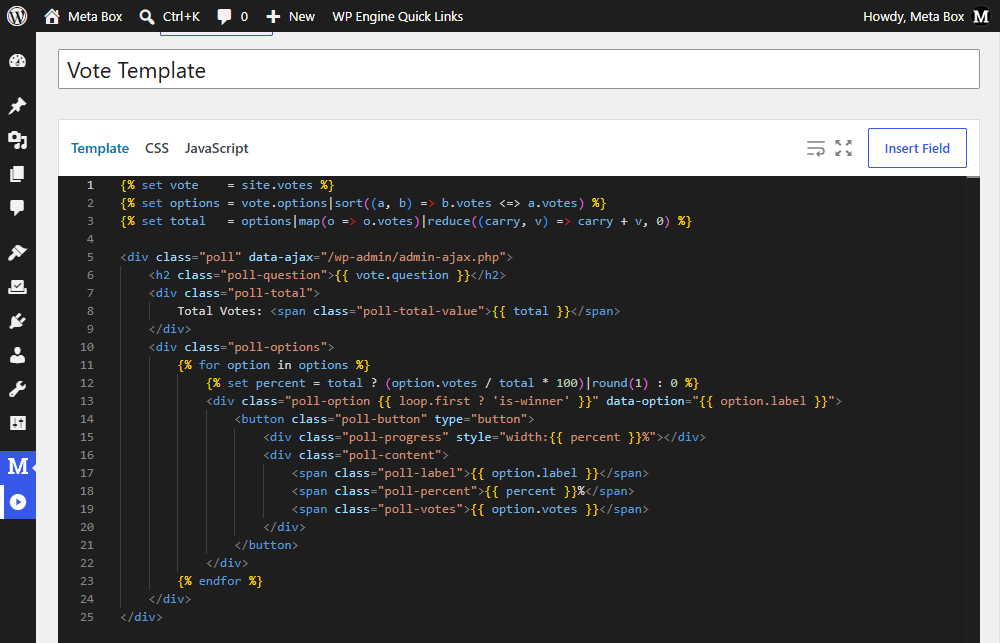
First, I get the voting poll data from site.votes and store it in the vote variable for simplicity and convenience.
{% set options = vote.options|sort((a, b) => b.votes <=> a.votes) %}
This line gets all the poll options and sorts them by the number of votes, from highest to lowest. So, the option with the most votes will be put first.
Next, {% set total = options|map(o => o.votes)|reduce((carry, v) => carry + v, 0) %} calculates the total number of votes across all options. The result is stored in the total variable, which we'll use to calculate the voting percentage for each option.
I use the data-ajax attribute stores the WordPress AJAX endpoint, which allows us to submit votes and update the results without reloading the page.
Then, I’m adding some div tags and classes for elements.
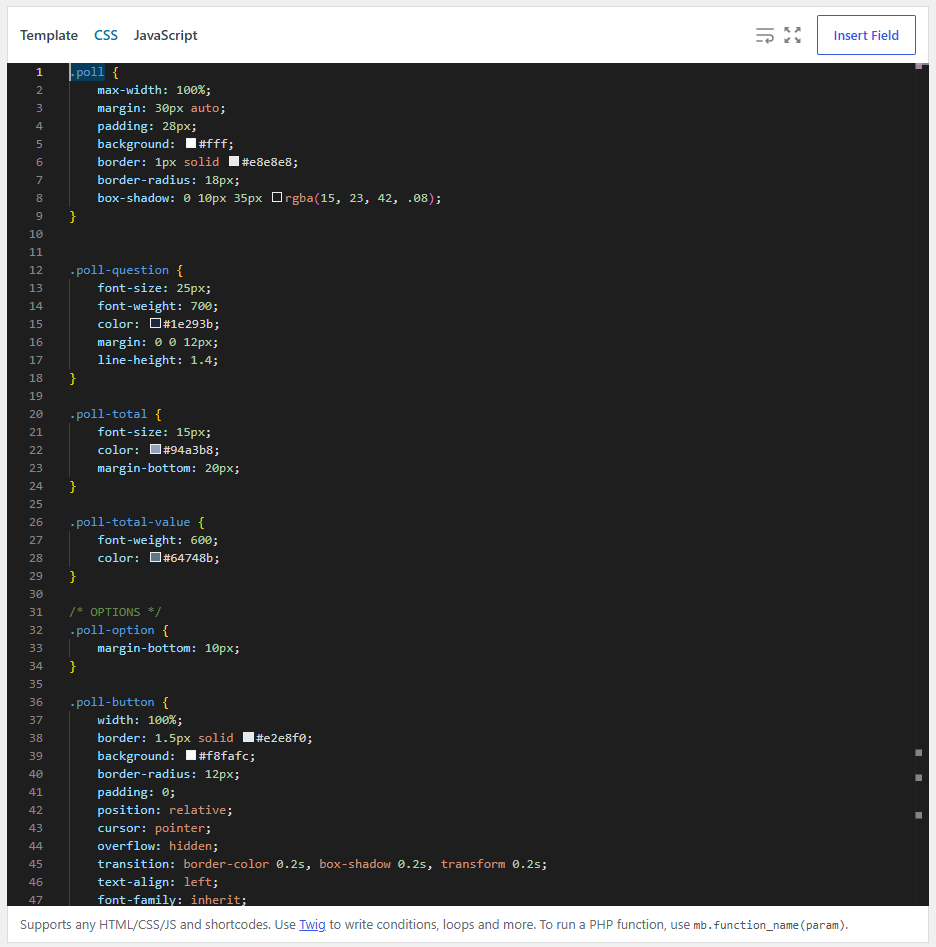
After that, move to the CSS tab to add some CSS for styling the poll.
Now, navigate to the JavaScript tab to handle interactivity for the poll.
document.addEventListener('DOMContentLoaded', () => {
    const poll = document.querySelector('.poll');
    if (!poll) return;

    poll.addEventListener('click', e => {
        const btn = e.target.closest('.poll-button');
        if (!btn || poll.classList.contains('voted')) return;

        const option = btn.closest('.poll-option').dataset.option;
        btn.disabled = true;

        fetch(poll.dataset.ajax, {
            method: 'POST',
            headers: { 'Content-Type': 'application/x-www-form-urlencoded' },
            body: new URLSearchParams({ action: 'submit_poll_vote', option })
        })
            .then(r => r.json())
            .then(res => {
                btn.disabled = false;
                if (!res.success) { alert(res.data.message); return; }
                updatePoll(res.data, option);
            })
            .catch(() => btn.disabled = false);
    });

    function updatePoll(data, votedOption) {
        const wrapper = poll.querySelector('.poll-options');
        const items = [...wrapper.querySelectorAll('.poll-option')];
        const maxVotes = data.options[0].votes;

        data.options.forEach(opt => {
            const el = wrapper.querySelector(`[data-option="${opt.label}"]`);
            if (!el) return;
            el.querySelector('.poll-progress').style.width = opt.percent + '%';
            el.querySelector('.poll-percent').textContent = opt.percent + '%';
            el.querySelector('.poll-votes').textContent = opt.votes;
            el.classList.toggle('is-voted', opt.label === votedOption);
            el.classList.toggle('is-winner', opt.votes === maxVotes);
        });

        const firstRects = Object.fromEntries(
            items.map(el => [el.dataset.option, el.getBoundingClientRect().top])
        );

        data.options.forEach(opt => {
            const el = wrapper.querySelector(`[data-option="${opt.label}"]`);
            if (el) wrapper.appendChild(el);
        });

        items.forEach(el => {
            const delta = firstRects[el.dataset.option] - el.getBoundingClientRect().top;
            if (!delta) return;
            el.style.cssText = `transform:translateY(${delta}px);transition:none`;
            el.getBoundingClientRect(); // trigger reflow
            el.style.cssText = 'transform:translateY(0);transition:transform 0.6s cubic-bezier(0.22,1,0.36,1)';
        });

        setTimeout(() => items.forEach(el => el.style.cssText = ''), 700);

        poll.querySelector('.poll-total-value').textContent = data.total;
        showVotedMessage(votedOption);
        poll.classList.add('voted');
    }

    function showVotedMessage(label) {
        let msg = poll.querySelector('.poll-message');
        if (!msg) {
            msg = Object.assign(document.createElement('div'), { className: 'poll-message' });
            poll.appendChild(msg);
        }
        msg.textContent = '✓ You voted for ' + label;
        msg.style.cssText = 'opacity:0;transition:opacity 0.4s ease';
        setTimeout(() => msg.style.opacity = '1', 50);
    }
});
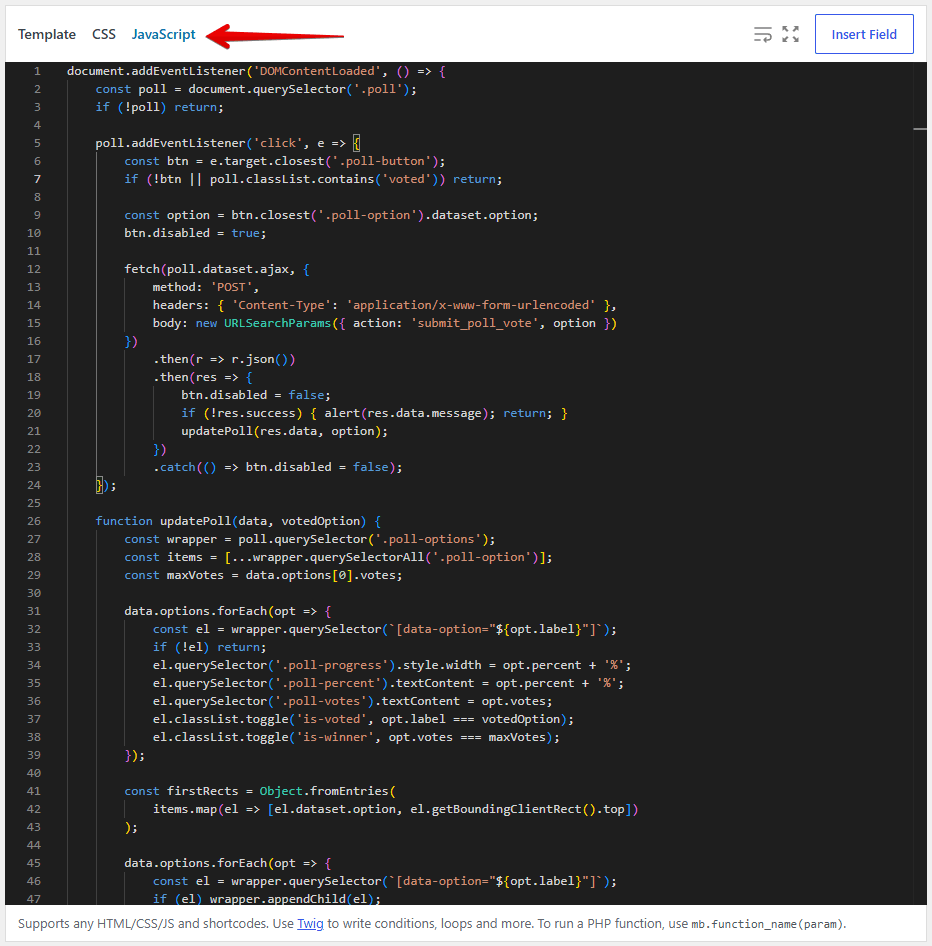
In there:
const poll = document.querySelector('.poll');
First, we have a line to find the poll element and store it in the poll variable. If no poll is found, the script stops.
poll.addEventListener('click', e => {
This listens for every click inside the poll.
const btn = e.target.closest('.poll-button');
if (!btn || poll.classList.contains('voted')) return;
This part checks whether the clicked element is a voting button or is inside one. While const option = btn.closest('.poll-option').dataset.option; gets the selected option from the poll-option attribute.
The next part is to send a POST request to the AJAX URL stored in the attribute, including the action and the option selected by the user.
Next, to update the results of the poll, I use this part.
function updatePoll(data, votedOption) {
    const wrapper = poll.querySelector('.poll-options');
    const items = [...wrapper.querySelectorAll('.poll-option')];
    const maxVotes = data.options[0].votes;

    data.options.forEach(opt => {
        const el = wrapper.querySelector(`[data-option="${opt.label}"]`);
        if (!el) return;
        el.querySelector('.poll-progress').style.width = opt.percent + '%';
        el.querySelector('.poll-percent').textContent = opt.percent + '%';
        el.querySelector('.poll-votes').textContent = opt.votes;
        el.classList.toggle('is-voted', opt.label === votedOption);
        el.classList.toggle('is-winner', opt.votes === maxVotes);
    });
I loop through each option to update the factors of poll-progress, poll-percent, and poll-votes. I also highlight the voted and the winning option.
const firstRects = Object.fromEntries(
    items.map(el => [el.dataset.option, el.getBoundingClientRect().top])
);
This records the original position of each option before the list is reordered.
items.forEach(el => {
    const delta = firstRects[el.dataset.option] - el.getBoundingClientRect().top;
    if (!delta) return;
    el.style.cssText = `transform:translateY(${delta}px);transition:none`;
    el.getBoundingClientRect(); // trigger reflow
    el.style.cssText = 'transform:translateY(0);transition:transform 0.6s cubic-bezier(0.22,1,0.36,1)';
});

setTimeout(() => items.forEach(el => el.style.cssText = ''), 700);
This part to reorder the options after voting and handle the animation the reordered options. The options according to their new order - from the most votes to the fewest.
Then, the next updates the total number of votes for the entire poll. As well as, a voting confirmation will be shown for the option they voted for.
That’s all for the interaction of the poll on the frontend.
Process and Store Actual Vote on the Server
Navigate to your theme file editor to add some PHP code.
add_action('wp_ajax_submit_poll_vote',        'submit_poll_vote');
add_action('wp_ajax_nopriv_submit_poll_vote', 'submit_poll_vote');

function submit_poll_vote() {
    $label = sanitize_text_field($_POST['option'] ?? '');
    $vote  = get_option('votes');

    if (empty($vote['options'])) {
        wp_send_json_error(['message' => 'No options found']);
    }

    $found = false;
    foreach ($vote['options'] as $i => $item) {
    if ($item['label'] === $label) {
        $vote['options'][$i]['votes'] = intval($item['votes']) + 1;
        $found = true;
        break;
    }
}

    if (!$found) {
        wp_send_json_error(['message' => 'Option not found']);
    }
    $total = array_sum(array_column($vote['options'], 'votes'));
    foreach ($vote['options'] as $i => $item) {
        $vote['options'][$i]['percent'] = $total
            ? round($item['votes'] / $total * 100, 1)
            : 0;
    }

    update_option('votes', $vote);
    usort($vote['options'], fn($a, $b) => $b['votes'] <=> $a['votes']);
    wp_send_json_success(['total' => $total, 'options' => $vote['options']]);
}
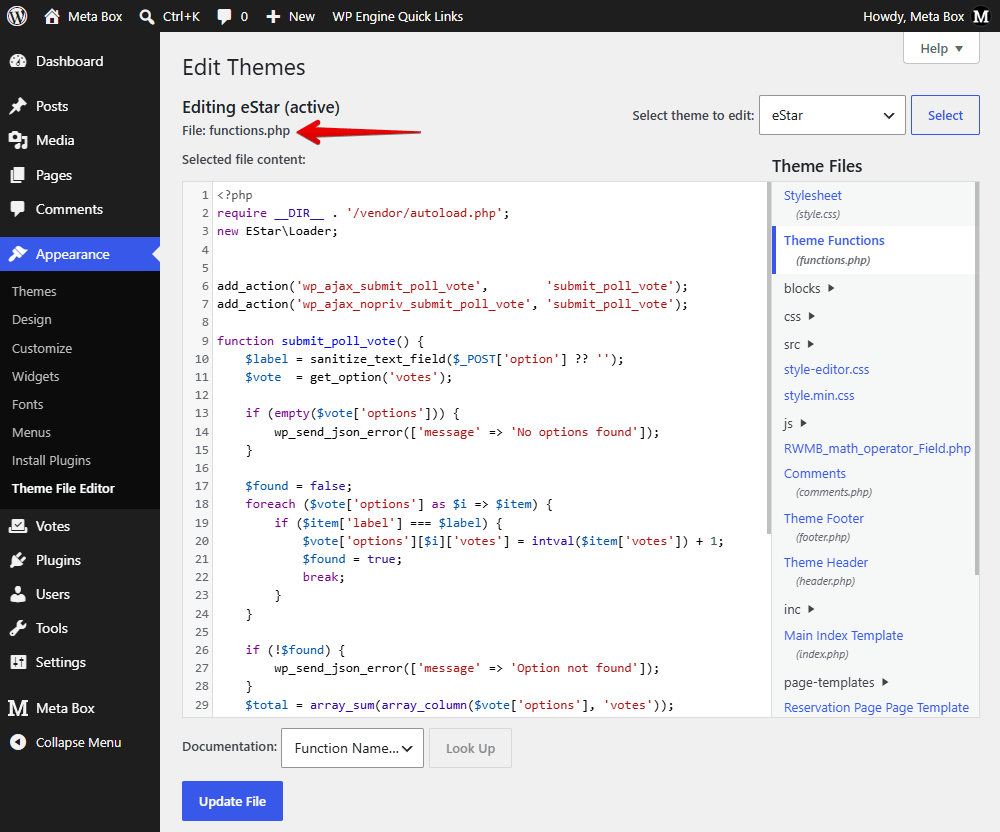
Specifically:
add_action('wp_ajax_submit_poll_vote',        'submit_poll_vote');
add_action('wp_ajax_nopriv_submit_poll_vote', 'submit_poll_vote');
This is to register AJAX actions for both logged-in users and non-logged-in visitors. submit_poll_vote is the action we get in the JavaScript.
I get the option from the POST request and the poll data stored in the WordPress database through the code:
function submit_poll_vote() {
    $label = sanitize_text_field($_POST['option'] ?? '');
    $vote  = get_option('votes');

    if (empty($vote['options'])) {
        wp_send_json_error(['message' => 'No options found']);
    }
Then, loop through the options to find the voted option. Its count will be increased by one.
After that, I calculate the total number of votes across all options and the voting percentage for each option based on the total number of votes.
Finally, I sort the options by vote count, from highest to lowest, after JavaScript reorder successfully.
Now, let’s check the poll on the frontend. When you click on an option to vote, its progress bar and percentage are updated immediately. This is the winning option, and this is the vote confirmation.
In the backend, the number of votes is also updated.
Limit One Vote Per ID Address
In some real cases, you might want to limit each account to voting only can vote one time. Just add some code to the theme file editor.
$ip        = $_SERVER['REMOTE_ADDR'];
$voted_ips = get_option('poll_voted_ips', []);
if (in_array($ip, $voted_ips)) {
    wp_send_json_error(['message' => 'You have already voted!']);
}
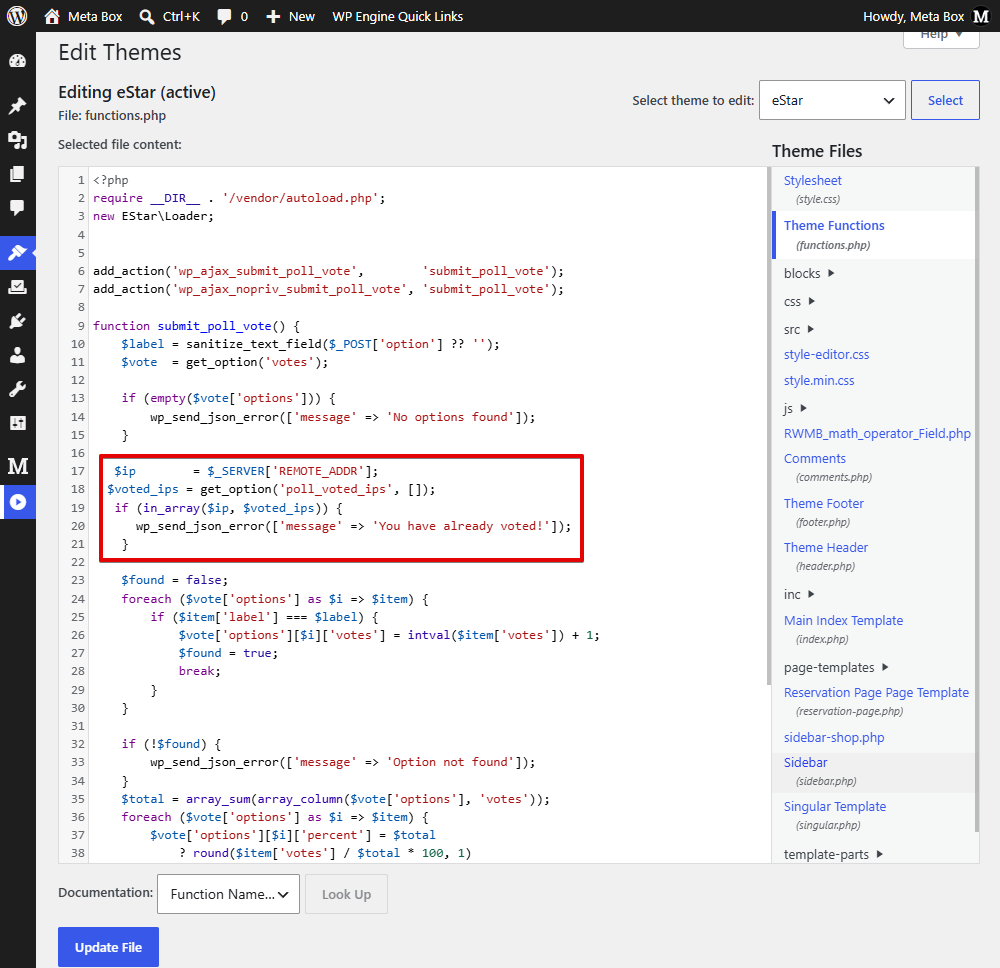
I added this part to get the user's IP address and the list of IP addresses that have already voted. We check whether the IP address has already voted. If it has, an error message is returned, and the vote is rejected.
$voted_ips[] = $ip;
update_option('poll_voted_ips', $voted_ips);
Also, add this part to add the current IP address to the list of voters and save the updated list. It allows the system to detect and reject another vote from the same IP.
That’s all.
I uploaded the code to GitHub, so you can refer to it.
Last Words
Creating a live voting poll in WordPress doesn’t have to be complicated. With Meta Box and MB Views, you can build a custom poll, display voting options, and show results dynamically without relying on a separate polling plugin.
You can also customize the poll’s layout and appearance to fit your website, giving you more control over how visitors interact with your content.
If you have any ideas for the next tutorials, please tell us in the comments below. Thanks for reading.
- MB Views: How To Display Relationships?
- How to Create Reusable Template Parts in WordPress
- How to Create YouTube Video Timestamps on WordPress Website - P1 - Using MB Views
- How to Randomize Hero Image in WordPress - Using MB Views
- How to Display a Video Playlist - Using MB Views
- How to Create a Reading Progress Bar in WordPress Posts - P1 - Using MB Views
- How to Create Reading Time to Your WordPress Posts - Using MB Views
- How to Add Code to Header and Footer in WordPress - Using MB Views
- How to Create Charts in Posts - Using MB Views
- How to Create a Dynamic Horizontal Posts Accordion - Using MB Views
- How to Manage & Display Course Schedule With Filters
- How to Create the Rating Feature for a WordPress Website - Using MB Views
- How to Create a Product Comparison Table - Using MB Views
- How to Search Posts on a Map - Using MB Views
- How to Create a Grid Layout for the Favourite Posts - Using MB Views
- How to Categorize Items in a Cloneable Group by Subfield Value - Using MB Views
- How to Create a Weather Forecast Widget - Using MB Views
- How to Create a Live Voting Poll in WordPress - Using MB Views
- Advanced Map Listings
- Author Bio
- Better 404 Page
- Blogs for Developers
- Building a Simple Listing Website with Filters
- Building an Event Website
- Building Forms with MB Frontend Submission
- Coding
- Create a Chronological Timeline
- Custom Fields Fundamentals
- Design Patterns
- Displaying Posts with Filters
- Download and Preview Buttons
- Dynamic Banners
- Dynamic Landing Page
- FAQs Page
- Featured Products
- Filter Posts by Relationships
- Filter Posts by Taxonomy
- Full Site Editing
- Google Fonts
- Gutenberg
- Hotel Booking
- Latest Products
- Logo Carousel
- MB Builder Applications
- MB Group Applications
- MB Views Applications
- Most Viewed Posts
- Opening Hours
- OTA Website
- Pricing Table Page
- Product Page
- Product Variations
- Querying and Showing Posts by Custom Fields
- Recipe
- Related Posts via Relationship
- Restaurant Menus
- SEO Analysis
- Simple LMS
- Speed Up Website
- Taxonomy Thumbnails
- Team Members
- User Profile
- Video Gallery

 Meta Box AIO 3.14: Preview Views, Shorter URLs & Login Limits
 How to Create the Rating Feature for a WordPress Website - Using MB Views
 How to Show Reviews on SERPs using Schema