
In many projects, you might start with cloneable fields because they are quick and easy to set up for simple data. As your requirements grow, a Group field becomes a better way to organize related information. However, after switching, existing data may no longer appear in the editor.
For example, when using a cloneable field to store speaker names, everything works fine at first. But after converting it to a Group field, even with a subfield for the same name, the old data seems to disappear. Don’t worry, it’s still in the database. Let’s see how to bring it back properly.

Video Version

Before Getting Started
For this guide, we naturally use Meta Box to create custom fields and a post type. Since the goal is to switch the field to a group structure, some premium Meta Box extensions are required. For convenience, we recommend using Meta Box AlO, which includes the framework and all extensions.
- MB Custom Post Type: to create a custom post type, since we’re applying custom fields to it. However, you don’t have to use a custom post type, you can apply the fields to any location you prefer;
- MB Builder: to create custom fields for event information visually;
- MB Group: to organize custom fields into user-friendly groups.
In this case, I already have a custom post type called Events, along with a custom field created for it. The field is currently set as cloneable to add multiple speakers.

Fill in the information in post editor.

Now, convert it to a group field type to store multiple related pieces of information.
Migrate Data From Cloneable Fields to Groups
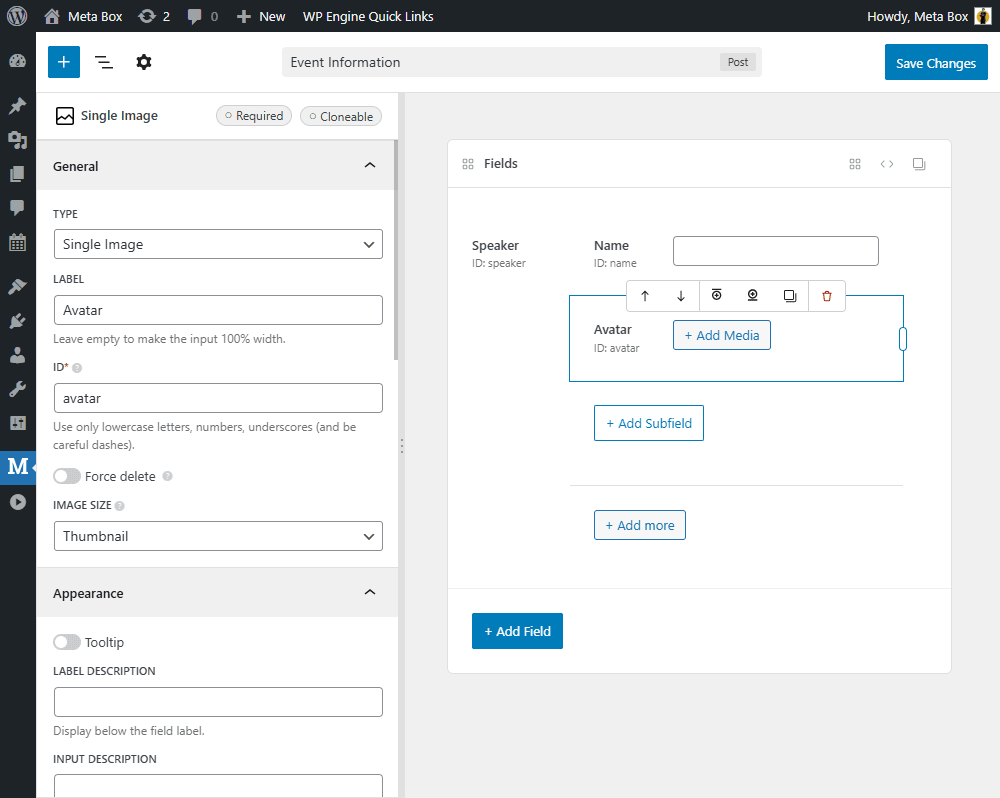
In real-world scenarios, you may need to group related information to create a better structure. Instead of storing only the speaker name, I also want to add another piece of information, for example, an avatar.
So now, go back to the field editor and change the standalone cloneable field to a Group field.

Then, add subfields you need. The most important subfield is the one that stores the speaker name because we’ll migrate the data from the old cloneable field into this new Group structure. And also add a field to store the speaker’s avatar.
In the old post editor, you'll see that the Group field appears correctly. However, the speaker names we previously entered are no longer displayed. But again, the data is still in the database.

So instead of re-entering everything manually, we’ll reconnect the data using a small piece of code. Go to the theme file editor and add the following code:

add_action( 'admin_init', function () {
    if ( get_option( 'event_speaker_migrated' ) ) {
        return;
    }
    $query = new WP_Query( [
        'post_type' => 'event',
        'posts_per_page' => 100,
        'post_status' => 'any',
        'meta_query' => [
            [
                'key' => 'speaker',
                'compare' => 'EXISTS',
            ],
        ],
    ] );
    foreach ( $query->posts as $post ) {
        $old = get_post_meta( $post->ID, 'speaker', true );
        if ( empty( $old ) || is_array( $old[0] ) ) {
            continue;
        }
        $new = [];
        foreach ( $old as $name ) {
            $new[] = [
                'name' => $name,
                'title' => '',
                'avatar' => '',
            ];
        }
        update_post_meta( $post->ID, 'speaker', $new );
    }
    update_option( 'event_speaker_migrated', true );
} );
Explanation:
add_action( 'admin_init', function () {
    if ( get_option( 'event_speaker_migrated' ) ) {
    return;
}
I create a hook that runs when entering the WordPress admin area. This means the code only runs in the admin dashboard, not on the front end.
We next check whether the migration has already been executed:
If the option event speaker migrated exists, it means the migration already ran before, so we stop the process to prevent it from running again.
Then we query the Event posts. Here, we retrieve up to 100 posts of the event post type and only those that have the meta key as speaker.
$query = new WP_Query( [
    'post_type' => 'event',
    'posts_per_page' => 100,
    'post_status' => 'any',
    'meta_query' => [
        [
            'key' => 'speaker',
            compare' => 'EXISTS',
        ],
    ],
] );
We use speaker because that was the field ID of the original cloneable field. Next, we loop through each post:
foreach ( $query->posts as $post ) {
We get the old data: This returns the entire array stored by the old cloneable field.
$old = get_post_meta( $post->ID, 'speaker', true );
After that, we check whether the data is empty or already in group format.
if ( empty( $old ) || is_array( $old[0] ) ) {
    continue;
}
Next, we create a new empty array:
$new = [];
Here, we convert the old array of strings into an array of structured objects that match the Group field format.
foreach ( $old as $name ) {
    $new[] = [
        'name' => $name,
        'title' => '',
        'avatar' => '',
   ];
}
We update the post meta and overwrite the old structure:
update_post_meta( $post->ID, 'speaker', $new );
After processing all posts, we save a small option in the WordPress database to mark that the migration is complete. This ensures the migration won’t run again the next time you enter the admin area.
update_option( 'event_speaker_migrated', true );
That’s all for the code. You can find the full code on GitHub. After confirming everything works correctly, make sure to remove the code to avoid unexpected problems later.
Refresh the post editor. You’ll see that the speaker names are back, this time inside the new Group structure.
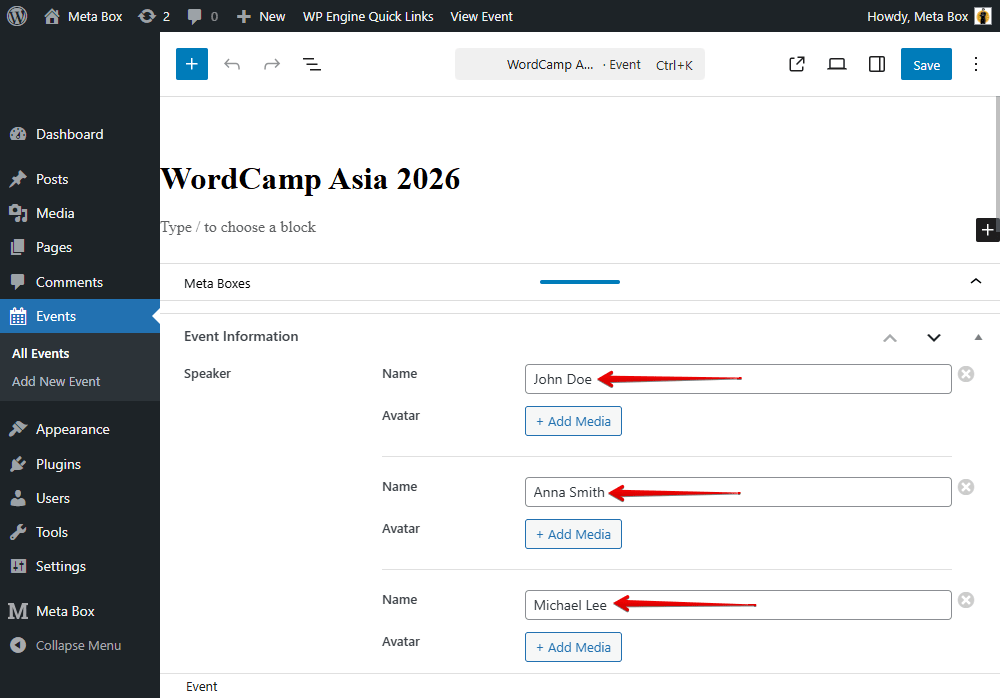
From here, you can safely add avatars or any additional subfields without losing your existing data.
Last Words
Your data never vanished; it just needed reconnecting. With a small script, you can upgrade to a Group field and keep every existing value intact, ready for a cleaner, more scalable setup.
If you also need to migrate data when changing field IDs, we have a dedicated tutorial for that. You can check it out to learn how to update field IDs without losing existing values.
- Advanced Map Listings
- Author Bio
- Better 404 Page
- Blogs for Developers
- Building a Simple Listing Website with Filters
- Building an Event Website
- Building Forms with MB Frontend Submission
- Coding
- Create a Chronological Timeline
- Custom Fields Fundamentals
- Design Patterns
- Displaying Posts with Filters
- Download and Preview Buttons
- Dynamic Banners
- Dynamic Landing Page
- FAQs Page
- Featured Products
- Filter Posts by Relationships
- Filter Posts by Taxonomy
- Full Site Editing
- Google Fonts
- Gutenberg
- Hotel Booking
- Latest Products
- Logo Carousel
- MB Builder Applications
- MB Group Applications
- MB Views Applications
- Most Viewed Posts
- Opening Hours
- OTA Website
- Pricing Table Page
- Product Page
- Product Variations
- Querying and Showing Posts by Custom Fields
- Recipe
- Related Posts via Relationship
- Restaurant Menus
- SEO Analysis
- Simple LMS
- Speed Up Website
- Taxonomy Thumbnails
- Team Members
- User Profile
- Video Gallery
 Meta Box - Divi Integration Walkthrough
  How to Display Images from Cloneable Fields - P3 - Meta Box + Bricks
  How to Add Custom Fields to Yoast SEO Meta Tags