
If you’re building or managing a content-rich website, such as Blogs, news, knowledge bases, documentation, product reviews, online courses or travel/food reviews, it’s necessary to have a page that contains all the favourite posts. Besides displaying those posts in a normal list, you can show them in a grid layout for a more attractive look, with the help of MB Views from Meta Box.
Below is an example for this guide:

Video Version

Before Getting Started
In each post, you can display the data you want. In this case, I show their featured images, titles and the publish dates.
And, as I said at first, displaying favourite posts as a grid layout will be an easy task with the help of MB Views. So, make sure that you have these plugins on your site:
- MB Favourite Posts: provides you with all the needed tools and features to add a Favourite button. So you can choose your favourite posts to save in your own lists. This solution is in the lifetime plan of Meta Box only.
- Meta Box AIO: to have a framework and all the advanced features from Meta Box. Especially, we use MB Views, to create a view for displaying favourite posts in a grid layout.
In the case that you need to use other functionalities from Meta Box, you can enable them as needed.
After installing the MB Favourite Posts solution, in the Settings menu, you’ll see the Favourite Posts menu. Go to it to set up for the Favourite button. To save time, I keep the settings as the default. In fact, you can change them, for example: the position of the button, its label and colour, and the icon.

I’ve had an archive page that shows all the posts, and this is the page on the frontend.

When you click to read the details of any posts, you can see the Favourite button with all the settings you set before. Click on the button to add that post as a Favourite.

Now, let’s move to the main step in this video: Show Favourite Posts in a Grid Layout.
Show Favourite Posts in a Grid Layout
First of all, we need to have a page that contains all the liked posts.

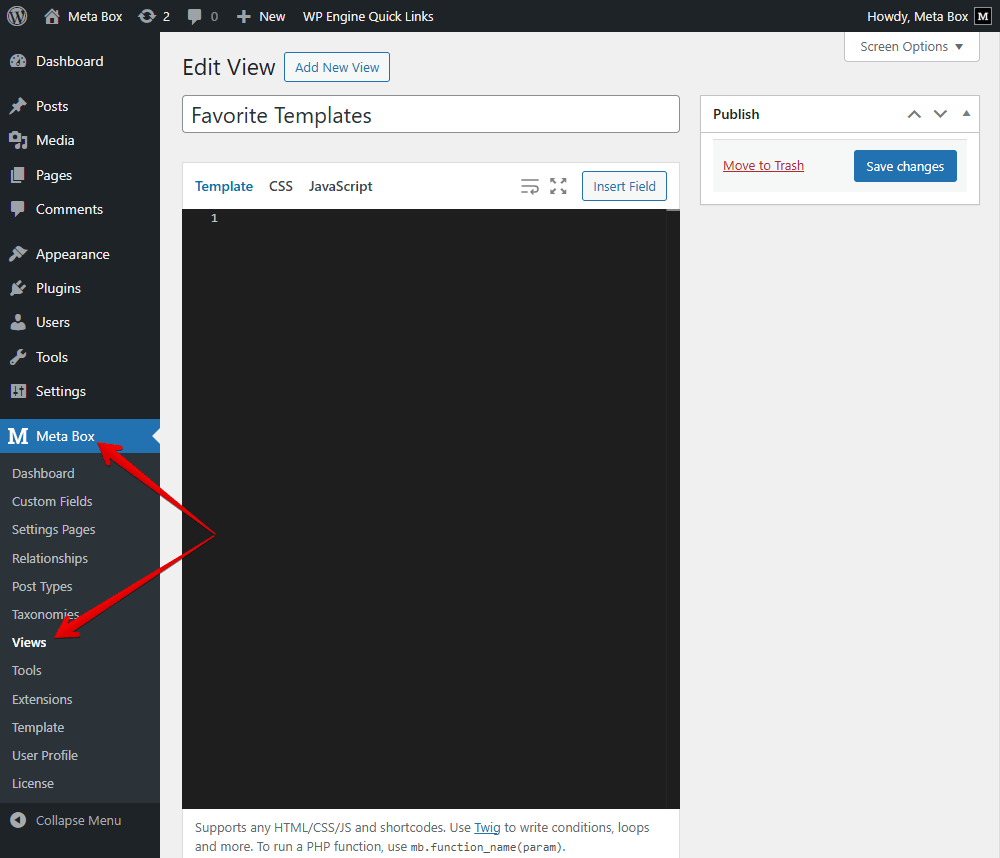
Then, navigate to Meta Box > Views to create a template for displaying posts that have been added to Favourites on the page.
Display Posts on the Page
In the Template tab, you can add code directly; however, I recommend you use the Insert Field button to quickly choose the field you want to get data from. Then, move to the Users tab, and you can see the Favourite posts option because each user account has a favourite list.
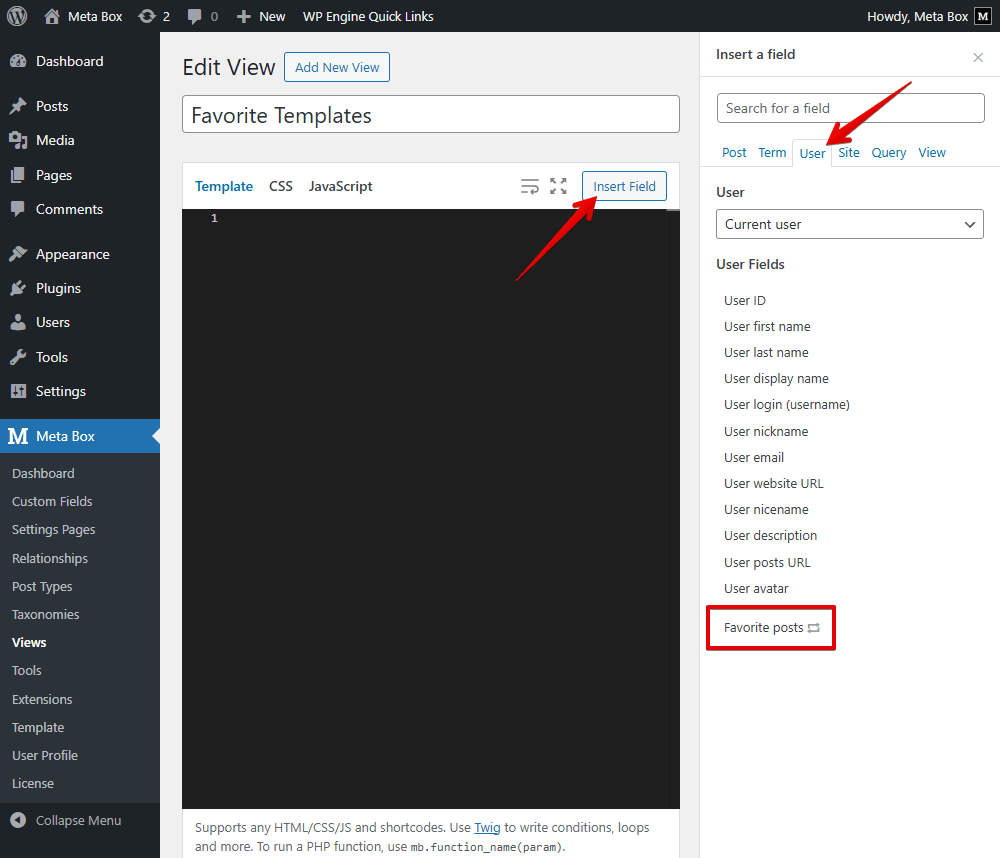
Click on it, and a pop-up will appear that allows you to choose the data output of the post.

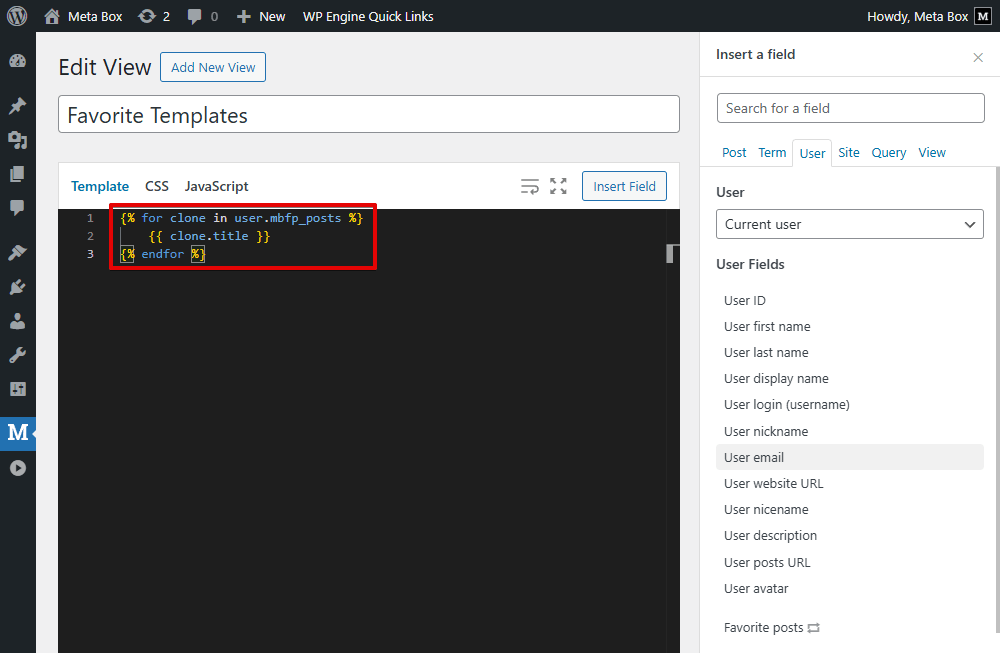
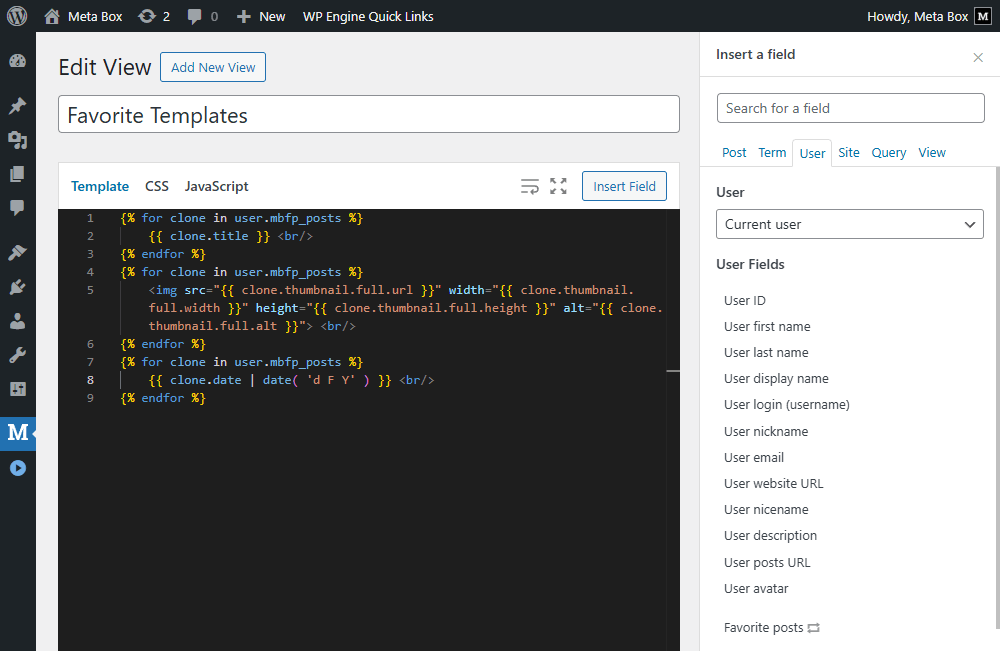
Then, just choose the field you want to display. I want to show the title, thumbnail and date. So, I select them one by one. There may be some favourite posts, that’s why a loop is added to the template along with the field you want to get data.
For some special fields, you can also customise the output of the data, like thumbnail size, or date format. After inserting all the fields and selecting their output we expected, we have the code like this:
Then, scroll down to the Settings section. Set the Type of the template as Singular, and choose the page you’ve created.
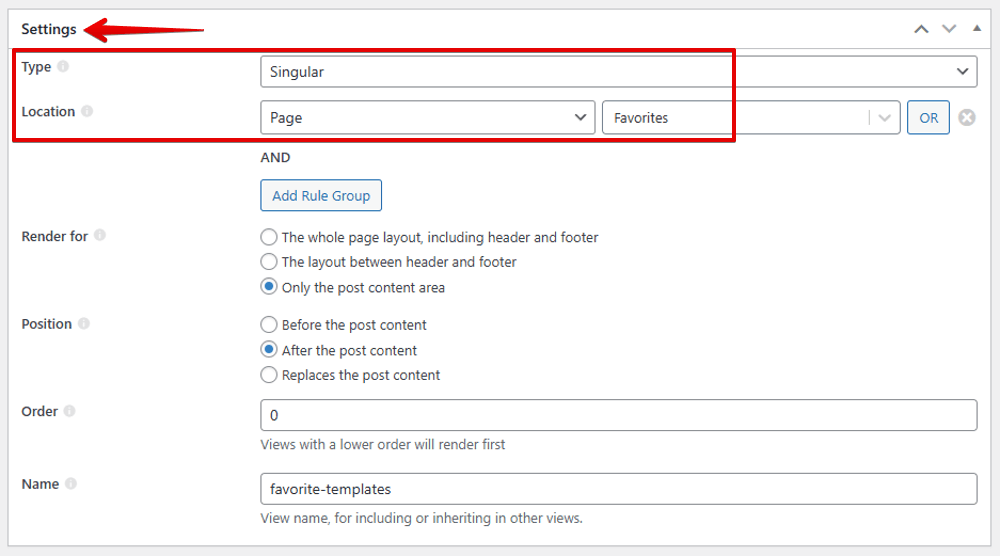
On the frontend of the page, you can see all the data displayed.

Obviously, when you add a post to Favourite, it will be shown on the page along with the information we get.
Create a Grid for the Page
To create a grid for the page and make it more attractive, I’ll modify the code in the created template a little bit.
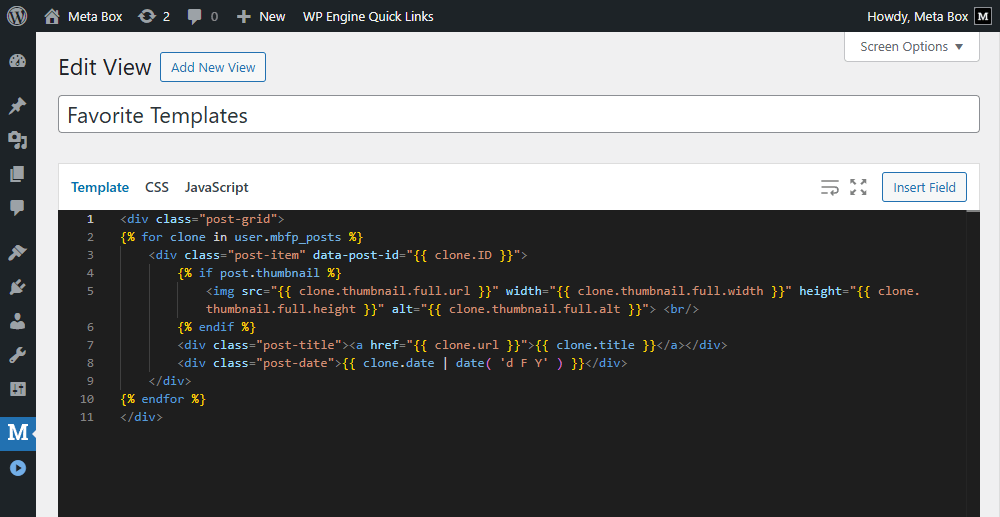
For the grid layout for the page, simply add a class for the post grid. I named the post-grid.
Next, to style the grid and data, go to the CSS tab, and add some code.

In this case, I want to create a grid with 3 columns. You can change this number as you want.
And, we get the new look of the page. The posts in a grid layout. When you add a post to Favourite, it is also added to the grid.
That's done for the expected layout. However, that is not the end. You can enhance this feature by adding a Delete button that allows users to remove posts from their Favourites. Let’s move on.
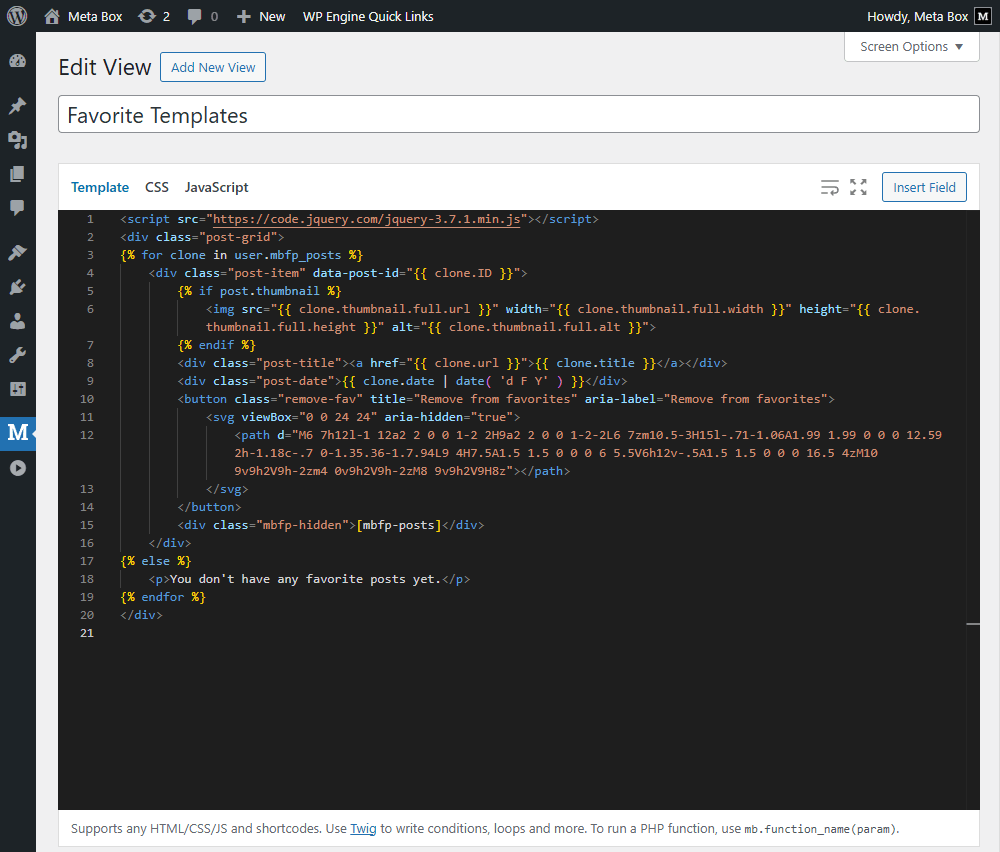
We’ll use JavaScript to achieve this. So, in the created template, we add some code like this:
In there:
To declare that we’ll use the JavaScript library to add the button to the post, I add the line of code: <script src="https://code.jquery.com/jquery-3.7.1.min.js"></script>.
I also add some code for the Remove button:
<button class="remove-fav" title="Remove from favorites" aria-label="Remove from favorites">
    <svg viewBox="0 0 24 24" aria-hidden="true">
        <path d="M6 7h12l-1 12a2 2 0 0 1-2 2H9a2 2 0 0 1-2-2L6 7zm10.5-3H15l-.71-1.06A1.99 1.99 0 0 0 12.59 2h-1.18c-.7 0-1.35.36-1.7.94L9 4H7.5A1.5 1.5 0 0 0 6 5.5V6h12v-.5A1.5 1.5 0 0 0 16.5 4zM10 9v9h2V9h-2zm4 0v9h2V9h-2zM8 9v9h2V9H8z"></path>
    </svg>
</button>
I use an SVG icon instead of normal text.
Additionally, [mbfp-posts] is the shortcode from the MB Favourite Posts plugin that allows you to display a list of favourite posts. But data from it will be hidden, and is used for the JavaScript action later.
You can also add a line to show the text when there is no post added to Favourites, or you have removed all the posts from the list.
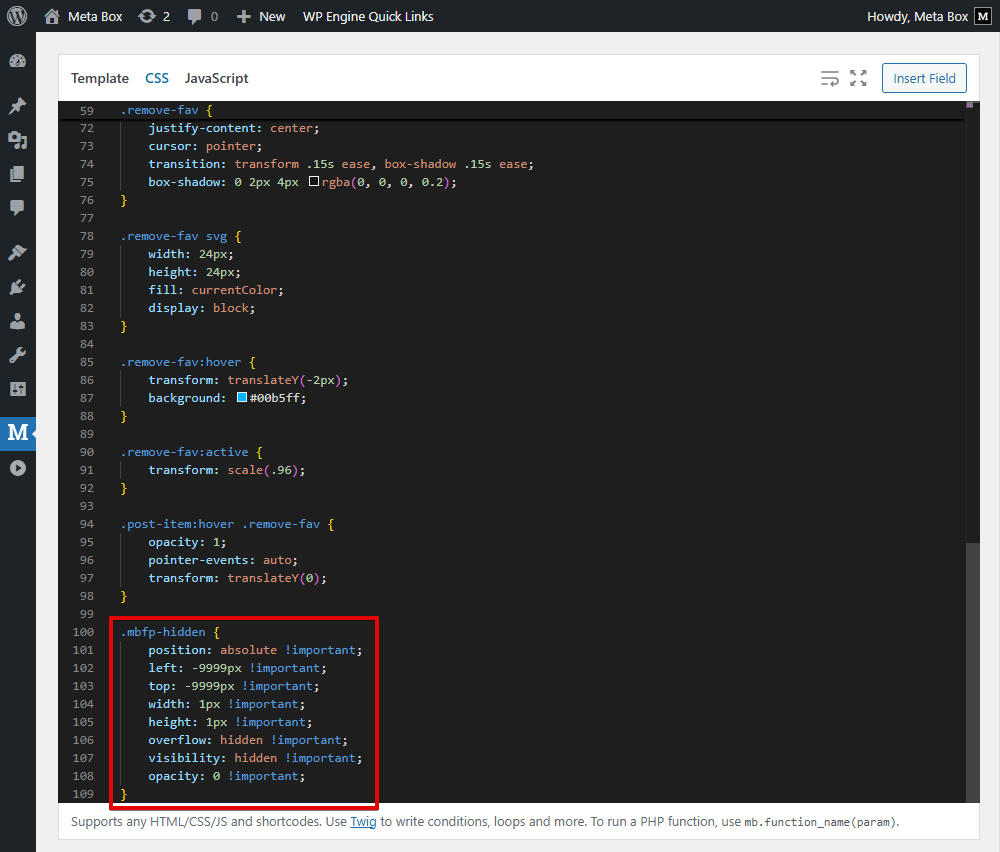
Don’t forget to add some code to style the new div tag and class in the CSS tab.
Now, navigate to the JavaScript to add actions for the button.
jQuery(document).ready(function ($) {
    setTimeout(function () {
        const $grid = $('.post-grid');
        if (!$grid.length) return;

        $grid.on('click', '.remove-fav', function (e) {
            e.preventDefault();
            const $item = $(this).closest('.post-item');
            const id = $item.data('post-id');
            if (!id) return;

            if (!confirm('Remove this post from favorites?')) return;

            $item.addClass('is-loading');

            $.post(window.MBFP.ajaxUrl, {
                action: 'mbfp_delete',
                id: id,
                _wpnonce: window.MBFP.deleteNonce
            })
                .done(function (res) {
                    if (!res || res.success !== true) {
                        alert((res && res.data) || 'Request failed');
                        $item.removeClass('is-loading');
                        return;
                    }
                    $item.remove();
                    if (!$grid.find('.post-item').length) {
                        const msg = (res.data && res.data.empty_notice) || 'No favorite posts yet.';
                        $grid.replaceWith('<p>' + msg + '</p>');
                    }
                })
                .fail(function (xhr) {
                    alert('Error occurred. Please try again.');
                    $item.removeClass('is-loading');
                });
        });
    }, 2000);
});

Let’s break through the code:
setTimeout(function () {
This code is to set the timeout for the plugin loading simply.
To select the post grid, I use two next lines:
const $grid = $('.post-grid');
if (!$grid.length) return;
$grid.on('click', '.remove-fav', function (e) {: is to recognise the click action. And remove-fav is the class of the remove button we created in the Template tab before. When the user clicks on it, the code below will be run.
e.preventDefault();
const $item = $(this).closest('.post-item');
const id = $item.data('post-id');
if (!id) return;
This part is to determine the post item that includes the clicked button, then get its ID.
To avoid accidental deletion, if (!confirm('Remove this post from favorites?')) return; is to show a confirmation dialogue that will prompt you to confirm the post removal.
Then, use some lines to send an AJAX request to WordPress.
$.post(window.MBFP.ajaxUrl, {
    action: 'mbfp_delete',
    id: id,
    _wpnonce: window.MBFP.deleteNonce
})
After that, the part below is to handle a successful request. The post item will be deleted from the page. Then check whether the gid has any items.
.done(function (res) {
    if (!res || res.success !== true) {
        alert((res && res.data) || 'Request failed');
        $item.removeClass('is-loading');
        return;
    }
    $item.remove();
    if (!$grid.find('.post-item').length) {
        const msg = (res.data && res.data.empty_notice) || 'No favorite posts yet.';
         $grid.replaceWith('<p>' + msg + '</p>');
    }
})
You can also regulate the action when the request is unsuccessful. Here, I allow the user to try again.
That’s done. I uploaded the code to GitHub so you can refer to it.
Now, let’s see the result.

The button is displayed when you hover over a post. And when you click on the button, this is our confirmation dialogue. Then, the post is removed. The code works well.
Last Words
With this page, you can save and manage your preferred content. This helps personalise content. As a result, you can increase the time on your site. Moreover, the grid layout also allows readers to quickly scan through content. Hope this guide is useful for you. Which topic do you want to look forward to in the next tutorial? Tell us in the comments below. Thanks for reading!
- MB Views: How To Display Relationships?
- How to Create Reusable Template Parts in WordPress
- How to Create YouTube Video Timestamps on WordPress Website - P1 - Using MB Views
- How to Randomize Hero Image in WordPress - Using MB Views
- How to Display a Video Playlist - Using MB Views
- How to Create a Reading Progress Bar in WordPress Posts - P1 - Using MB Views
- How to Create Reading Time to Your WordPress Posts - Using MB Views
- How to Add Code to Header and Footer in WordPress - Using MB Views
- How to Create Charts in Posts - Using MB Views
- How to Create a Dynamic Horizontal Posts Accordion - Using MB Views
- How to Manage & Display Course Schedule With Filters
- How to Create the Rating Feature for a WordPress Website - Using MB Views
- How to Create a Product Comparison Table - Using MB Views
- How to Search Posts on a Map - Using MB Views
- How to Create a Grid Layout for the Favourite Posts - Using MB Views
- How to Categorize Items in a Cloneable Group by Subfield Value - Using MB Views
- Author Bio
- Better 404 Page
- Blogs for Developers
- Building a Simple Listing Website with Filters
- Building an Event Website
- Building Forms with MB Frontend Submission
- Coding
- Create a Chronological Timeline
- Custom Fields Fundamentals
- Design Patterns
- Displaying Posts with Filters
- Download and Preview Buttons
- Dynamic Banners
- Dynamic Landing Page
- FAQs Page
- Featured Products
- Filter Posts by Relationships
- Filter Posts by Taxonomy
- Full Site Editing
- Google Fonts
- Gutenberg
- Hotel Booking
- Latest Products
- Logo Carousel
- MB Builder Applications
- MB Group Applications
- MB Views Applications
- Most Viewed Posts
- Opening Hours
- OTA Website
- Pricing Table Page
- Product Page
- Product Variations
- Querying and Showing Posts by Custom Fields
- Recipe
- Related Posts via Relationship
- Restaurant Menus
- SEO Analysis
- Simple LMS
- Speed Up Website
- Taxonomy Thumbnails
- Team Members
- User Profile
- Video Gallery
 How to Pin Newest Featured Posts Above Regular Posts Using MB Views
  How to Create a Simple Listing - P6 - Using MB Views
  How to Create a Load More Button with Meta Box