
If you’re finding the way to categorize items in a cloneable group by subfield value, this blog is for you. We’ll do it with the help of MB Views.
Imagine that you are managing a school and you need to build a detailed list of your teachers, making sure all relevant information is included and clearly categorized by subject. This is exactly where this method becomes useful.
You can use this approach in many cases, for example, when building a summary page of study materials for students, where the resources are grouped by subject, or if you manage a restaurant and want to organize menu items into categories like appetizers, main courses, desserts, and more.
I use a teacher listing as an example. The page displays detailed information such as teachers’ names, subjects, and photos, and it can be categorized by subject.

Video Version

Before Getting Started
Since each teacher shares the same set of information, I’ll use a cloneable group to store their details. To display these groups and categorize them, I’ll create a template using MB Views.
So, I recommend that you use Meta Box AIO to have the framework for creating a template and custom fields. As well as the Meta Box extensions inside it provide you with advanced features, specifically:
- MB Views: to create a page template for displaying the listings and categorize it.
- MB Builder: to have a UI in the back end to create custom fields easily.
- MB Group: to organize custom fields into groups.
Now, let’s go step by step.
Create Custom Fields for Teacher
First, create a new page for the teacher listing.

Next, go to Meta Box, Custom fields, and create a new field group for the teacher information.
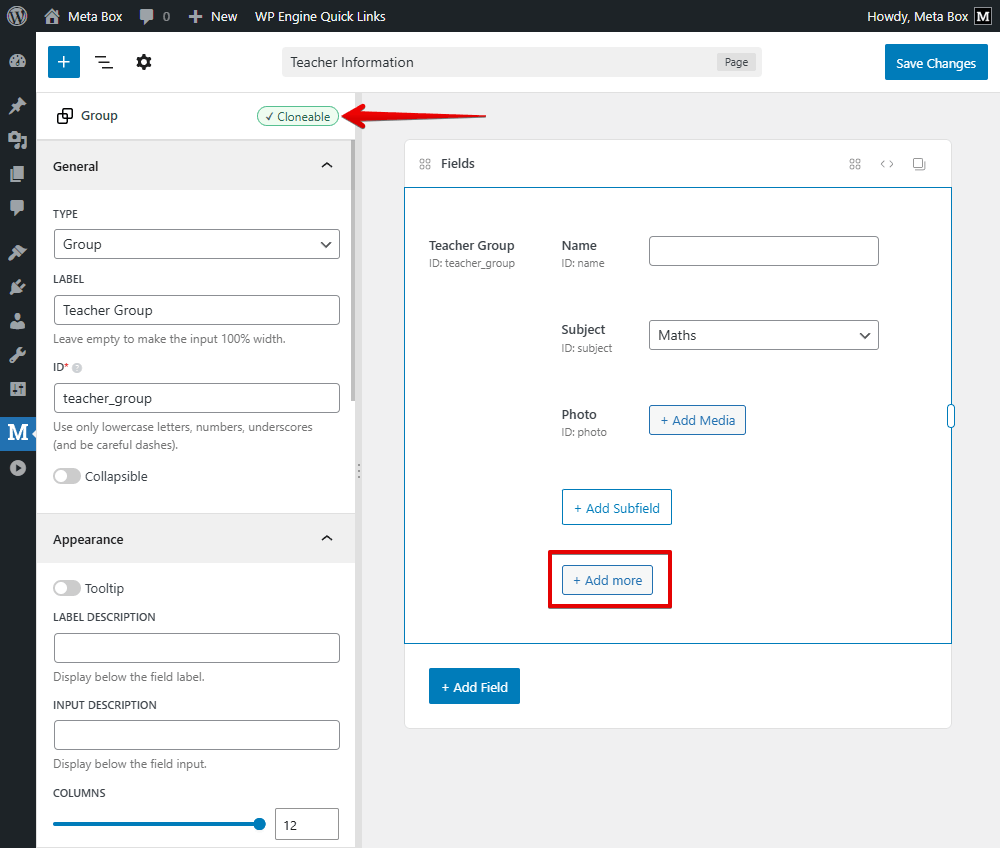
First, add a Group field.

Inside the group, add the subfield as the structure you want. Simply add a Text field for the name. And use a Select field for the subject. In the Choices section, input the options.

Following this, add a Single Image field for the photo.
I set the group as cloneable to add more than one item for the teacher information.
After saving, move to the Settings tab, set the Location as Page, then select the page you created for the teachers.

Now, go to the page editor then you will see all of the custom fields. Just enter information for each teacher, and click on the + Add more button to add other information for your needs.

Categorize Items in a Cloneable Group by Subfield Value
Display Items on the Page
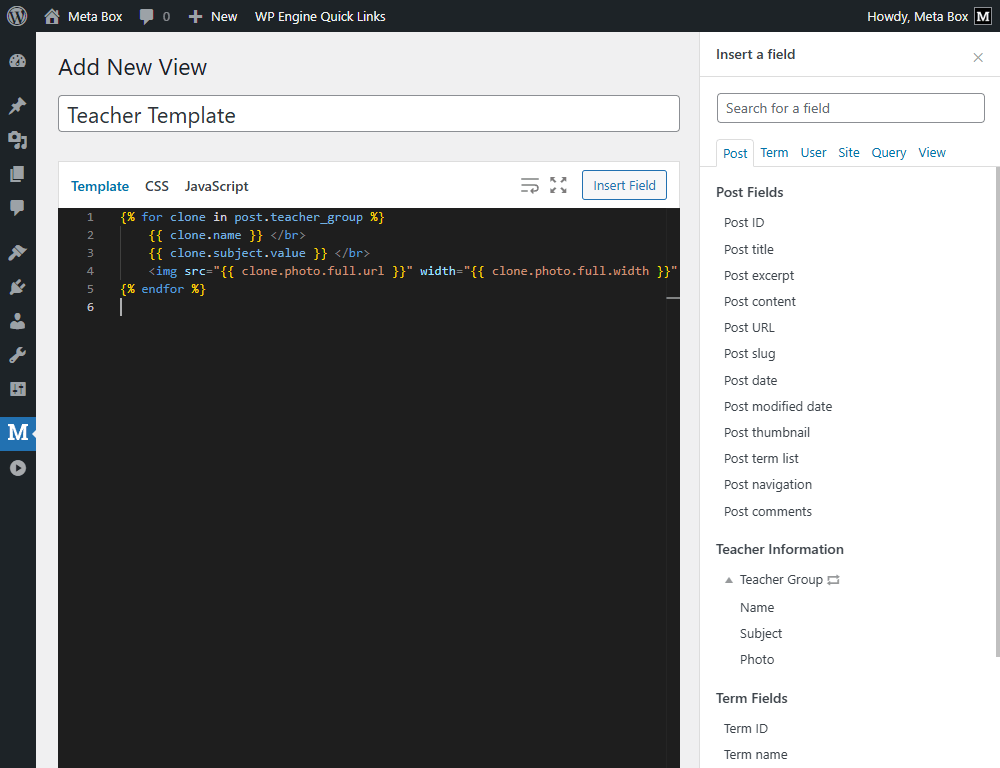
Go to Meta Box > Views, and add a new view.
In the Template tab, besides adding code directly, you can use the Insert Fields to get data from the fields, then you can see the field group we need.
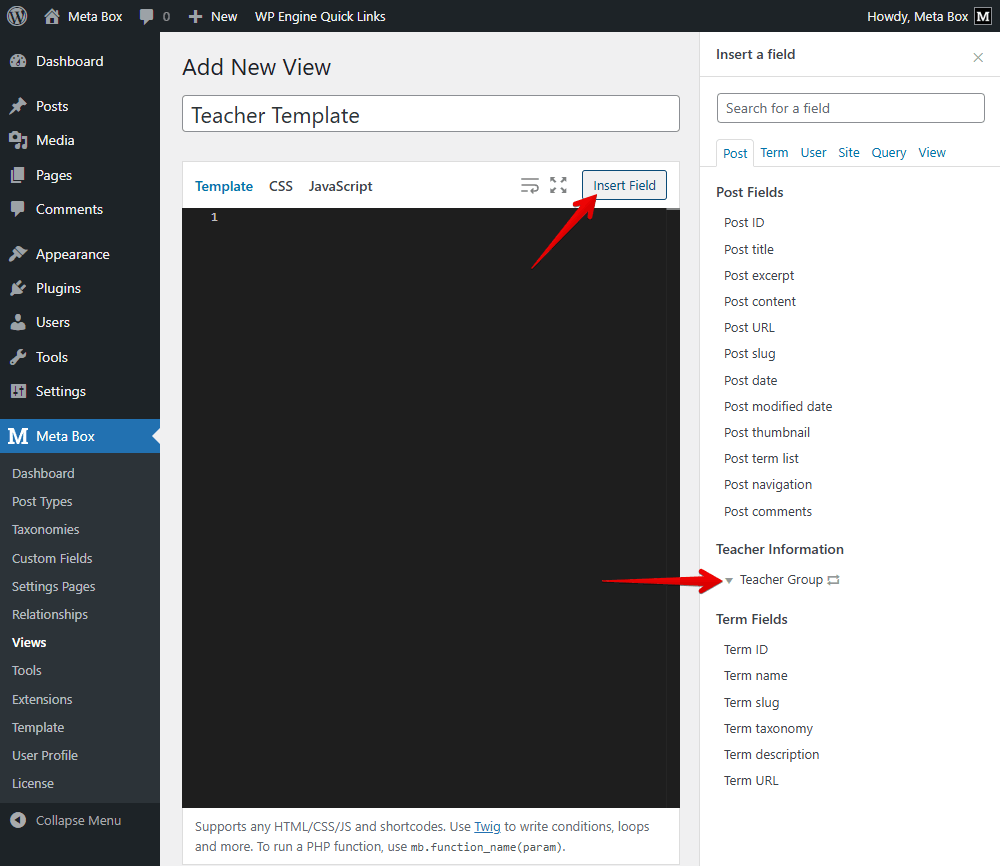
Since it is a cloneable group, when you click on it, there’ll be a loop shown in the Template tab. Inside this loop, insert the subfield you want to get the value of as usual. And we have the code like this:
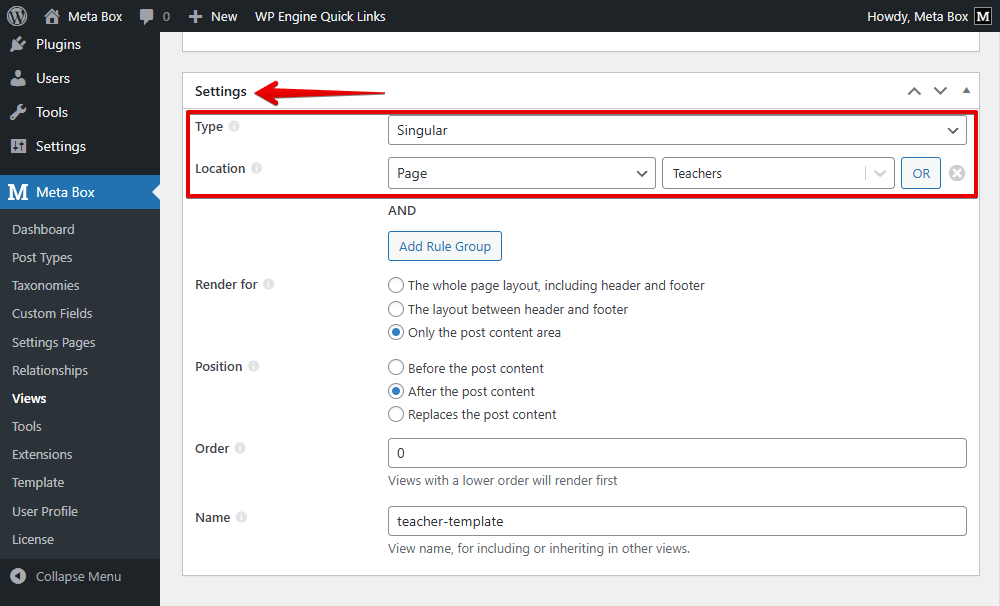
After inserting all the fields you need, scroll down to the Settings section, choose the type of template as Singular, set the Location as Page, then select the page you created for the teachers' listing.
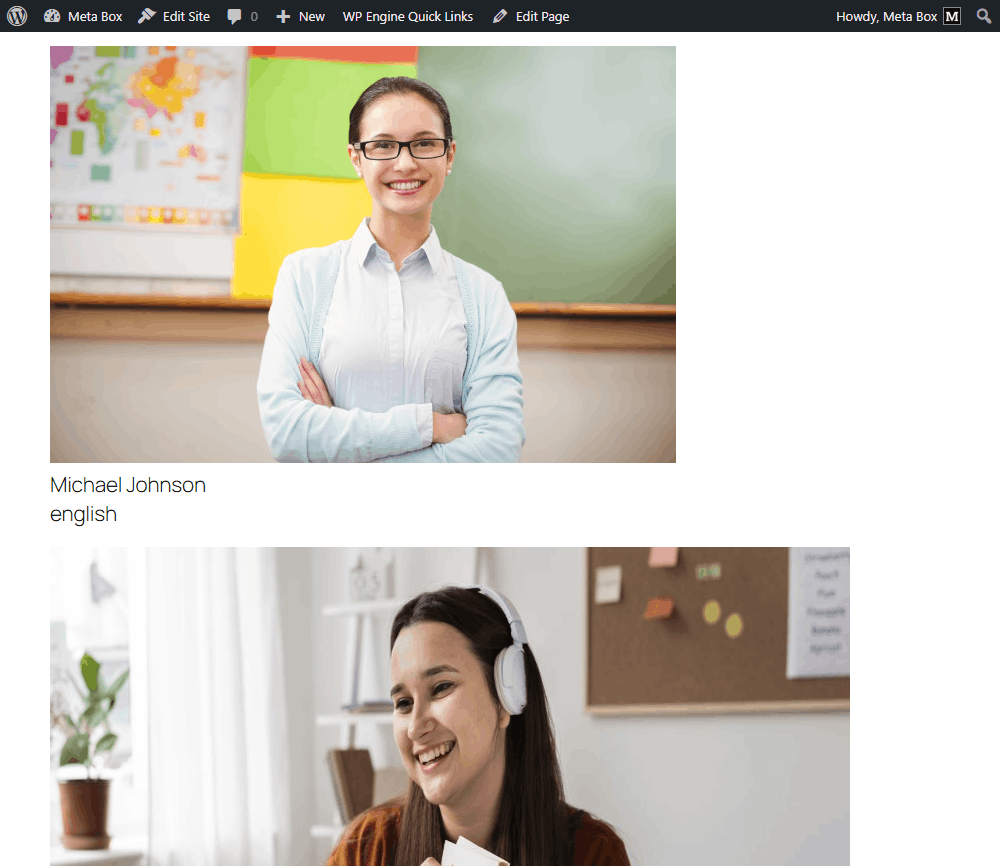
On the frontend, the page displayed all the teachers and their information.
Next, we’ll style the page and categorize the teachers' list clearly by subject.
Categorize Teachers By Subjects
I use created template to add some code.

Let’s break down the code.
First, I use the line {% set members = [] %} to create an empty array.
I modified the loop that displays teacher information.The loop here will go through the teachers listing.
Next, I create another empty array named grouped, which is used to organize teachers by subject.
Then, I add the part:
{% for member in members %}
    {% set subj = member.subject ?? 'Other' %}
    {% if grouped[subj] is not defined %}
        {% set grouped = grouped|merge({ (subj): [member] }) %}
    {% else %}
        {% set grouped = grouped|merge({ (subj): grouped[subj]|merge([member]) }) %}
    {% endif %}
{% endfor %}
It checks each teacher in the member list and places them into a group based on their subject. If a teacher does not have a matching subject, they are added to an “other” group. In addition, if a subject does not exist yet, a new group is created and the teacher is added to it. Otherwise, the teacher is simply added to the existing list for that subject.
The next step is to display teachers listing on the archive page:
<div class="teacher-wrapper">
    {% for subj, items in grouped %}
    <div class="subject-block">
        <h3 class="subject-heading">{{ subj }}</h3>
        <div class="teacher-grid">
            {% for item in items %}
                <div class="teacher-card">
                    {% if item.photo %}
                        <div class="teacher-thumb">
                            <img src="{{ item.photo }}" alt="{{ item.photo_alt }}">
                        </div>
                    {% endif %}
                    <div class="teacher-info">
                        <h4 class="teacher-name">{{ item.name }}</h4>
                             <p class="teacher-subject">{{ item.subject }}</p>
                         </div>
                    </div>
                {% endfor %}
        </div>
    </div>
    {% endfor %}
</div>
In there, we have two nested loops: the parent is to loop each subject and show its name as a heading. And, another one displays the teachers belonging to that subject, including their name, subject, and photo if available.
Next, move to the CSS tab and add code for styling.
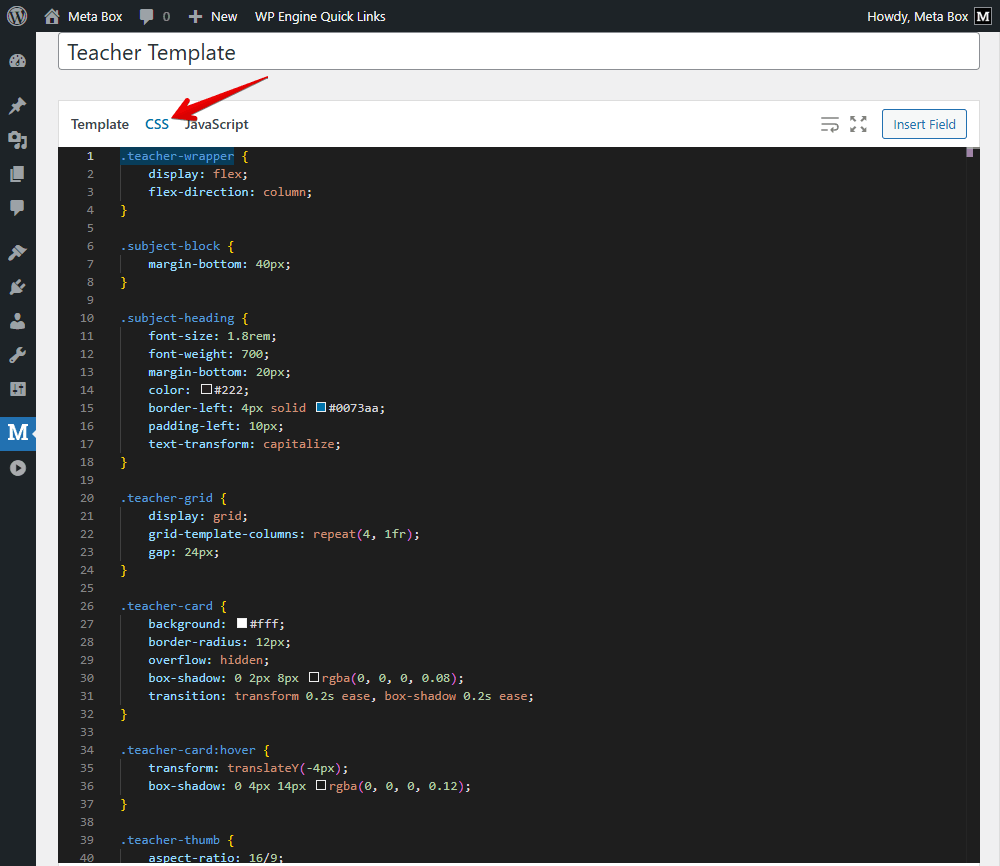
You can refer to the code I use on GitHub.
And finally, we have a new look of the page, each subject is a separate block, and inside are the teacher cards for that subject.
Last Words
MB Views extension makes categorizing items in a cloneable group by subfield value an easy task. And your listing is clearer to overview and go to the category the reader wants. You can explore the power of this extension in this series. Thanks for reading!
- MB Views: How To Display Relationships?
- How to Create Reusable Template Parts in WordPress
- How to Create YouTube Video Timestamps on WordPress Website - P1 - Using MB Views
- How to Randomize Hero Image in WordPress - Using MB Views
- How to Display a Video Playlist - Using MB Views
- How to Create a Reading Progress Bar in WordPress Posts - P1 - Using MB Views
- How to Create Reading Time to Your WordPress Posts - Using MB Views
- How to Add Code to Header and Footer in WordPress - Using MB Views
- How to Create Charts in Posts - Using MB Views
- How to Create a Dynamic Horizontal Posts Accordion - Using MB Views
- How to Manage & Display Course Schedule With Filters
- How to Create the Rating Feature for a WordPress Website - Using MB Views
- How to Create a Product Comparison Table - Using MB Views
- How to Search Posts on a Map - Using MB Views
- How to Create a Grid Layout for the Favourite Posts - Using MB Views
- How to Categorize Items in a Cloneable Group by Subfield Value - Using MB Views
- Author Bio
- Better 404 Page
- Blogs for Developers
- Building a Simple Listing Website with Filters
- Building an Event Website
- Building Forms with MB Frontend Submission
- Coding
- Create a Chronological Timeline
- Custom Fields Fundamentals
- Design Patterns
- Displaying Posts with Filters
- Download and Preview Buttons
- Dynamic Banners
- Dynamic Landing Page
- FAQs Page
- Featured Products
- Filter Posts by Relationships
- Filter Posts by Taxonomy
- Full Site Editing
- Google Fonts
- Gutenberg
- Hotel Booking
- Latest Products
- Logo Carousel
- MB Builder Applications
- MB Group Applications
- MB Views Applications
- Most Viewed Posts
- Opening Hours
- OTA Website
- Pricing Table Page
- Product Page
- Product Variations
- Querying and Showing Posts by Custom Fields
- Recipe
- Related Posts via Relationship
- Restaurant Menus
- SEO Analysis
- Simple LMS
- Speed Up Website
- Taxonomy Thumbnails
- Team Members
- User Profile
- Video Gallery
 Reorder Items by Their Values from Cloneable Custom Fields
  How to Create a Pricing Table Page - P3 - Using MB Views
  Meta Box - Divi Integration Walkthrough