
A well-designed product page can enhance the customer experience and lead to increased sales. It should include details like various information, images, and specifications to help customers make informed decisions. In this practice, we are going to find out how to create a Product Page using Meta Box and Zion.
Check out the car rental page I made as an example:

Video Version

Before Getting Started
This page contains the product's detailed information and its gallery. It’s a singular page of your product post type. The name and description of the product are the title and content of the post. The remaining detailed information will be saved in the custom fields.
So, we need the Meta Box AIO to have the framework for creating custom post types and custom fields for your products.
Besides, we need some Meta Box’s extensions for advanced features:
- MB Custom Post Types: to create a custom post type for the products.
- MB Builder: to have a UI on the backend to create custom fields easily.
- MB Views: to create a template for displaying a gallery.
Finally, we need Zion and its Pro version to build the page.
Create a Custom Post Type
Go to Meta Box > Post types and create a new post type for your products.

After publishing, you will see a new menu displayed. It's your post type.
Create Custom Fields
In this practice, I just create some basic fields for typical information of the product.

Go to Meta Box > Custom Fields to create them one by one.

Choosing the Number field for numeric information, such as rental price, car year, and max passengers.


About the max passengers' information, you can also enter numbers in the Min value and Max value boxes to limit the number of passengers.

Next one, choose the Select field to contain selective information such as fuel, doors, gearbox. Fill in the options into the Choice box.


For other information such as fuel usage, engine capacity, max luggage, select the Text field. In the Input description box, you can add some descriptions to add information to the field.


The last field is the gallery, choose an Image Advanced field to allow the user upload multiple images.


After creating all the fields, move to the Settings tab, choose Location as Post Type, and then select Car Rental to apply these fields to this post type.

Create a Template for the Product Page
Go to the Zion Builder > Theme builder > Add new template to create a new template.

Then, in the list below, check the All Car Rentals option so that this template will be used for all posts of the post type.

Add Body to this template and now edit it.

Go to the Page options, choose Dynamic data review source.

In the Select post, you can see the Source type and the post type name available. You can also choose the post of that post type to have a preview.

Now, add a Section to cover all of the product information. Add a Column.

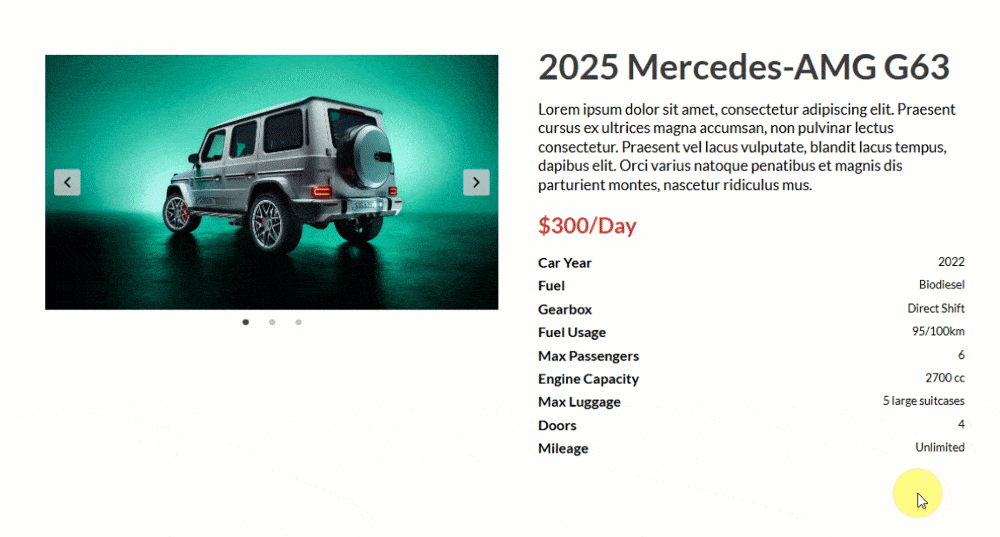
I’ll build the product page following the corresponding layout with two columns. The first one is for the gallery, and the rest is for other information.

So, select the corresponding layout, and change the Content orientation to horizontal.

In the first column, we’ll display the image gallery of the product. However, Zion doesn’t support doing it. We need to use MB Views to have the gallery, then paste the shortcode generated from the view into this element.
So, I added a Shortcode element.

Next, we’ll move to Meta Box > Views, and create a new view for the gallery.

I use the Insert Field button to find out which field stores the gallery. After selecting the image size, you can see the loop in the Template tab because there is more than one image.

After publishing, you can see the Shortcode I mentioned before. Just copy it and paste into Zion.


Now, we’ll get and display data for the second column.
First, add a Heading element for the product name.

Then, click on Use dynamic data and choose Post title.

For the description, simply use a Text element. Also use dynamic data, and select Post content.


Next, to display the price, add a Text element as well. Its data is saved in a custom field created with Meta Box. So, you should use dynamic data, then find the Meta Box Field.

Inside the Field options pop-up, you can see the Rental Price field. Click on it, and the price will be shown.

Regarding the remaining information, they have the same style with 2 columns. The first one is the name of the product characteristic, and the second one is the value that is obtained from the custom fields.

Therefore, I add a Column element, then choose a suitable layout.

I use the Text elements for both columns. For the left column, type the name in the Content box.

In the right column, connect the text element to the custom field to get the data using the dynamic content. This process is similar to the price.

For the rest, do the same.
To save time, I duplicate it. Then, change the name and value to get the right one.

We’ve just finished getting all of the information about the product. Let’s see how it displays on the frontend.
Style the Page
Back to the page editor with Zion. Just change some parameters and settings in the Styling and Advanced tab of each block.

Now, it’s better, but the gallery hasn’t yet. To style it, back to the view on Meta Box that we created.
To transfer the separate images to the gallery, I’ll use some CSS and JavaScript libraries. So in the Template tab, I declared them.
First, add this code:
<div class="car-gallery">
{% for item in post.gallery %}
<img src="{{ item.full.url }}" width="{{ item.full.width }}" height="{{ item.full.height }}" alt="{{ item.full.alt }}">

Then, move to the CSS tab to add some code.

jQuery(document).ready(function ($) {
    $('.car-gallery').slick({
        infinite: true,
        arrows: true,
        slidesToShow: 1,
        slidesToScroll: 1,
        dots: true,
    });
});
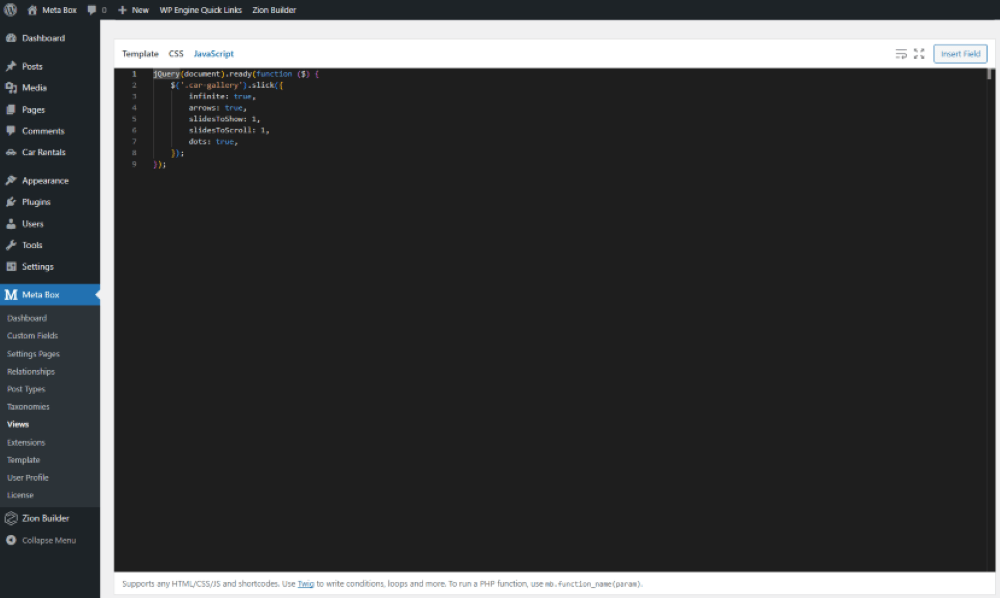
In there:
$('.car-gallery').slick({: is to select the element withcar-gallery-
infinite: true,
arrows: true,
slidesToShow: 1,
slidesToScroll: 1,
dots: true,
These are some attributes as the slider features, such as infinite looping; left and right navigation arrows; and others.
That’s done. Let’s see the page on the frontend. The slideshow works well.
Last Words
We’ve explored how to create a product page with Meta Box and Zion. If you’re interested in exploring other approaches, you can find it in this series. And if you have any topic suggestions, don’t hesitate to leave a comment. Good luck!
- How to Create a Product Page using Meta Box Plugin
- How to Create a Product Page - P2 - Using Meta Box and Oxygen
- How to Create a Product Page - P3 - Using Meta Box and Bricks
- How to Create a Product Page - P5 - Using Meta Box and Gutenberg
- How to Create a Product Page - P4 - Using Meta Box and Elementor
- How to Create a Product Page - P6 -Using Meta Box and Breakdance
- How to Create a Product Page - P7 - Using Meta Box + Kadence
- How to Create a Product Page - P8 - Using Meta Box and Brizy
- How to Create a Product Page - P9 - Using Meta Box and Divi
- How to Create a Product Page - P11- Using Meta Box + Zion
- Author Bio
- Better 404 Page
- Blogs for Developers
- Building a Simple Listing Website with Filters
- Building an Event Website
- Building Forms with MB Frontend Submission
- Coding
- Create a Chronological Timeline
- Custom Fields Fundamentals
- Design Patterns
- Displaying Posts with Filters
- Download and Preview Buttons
- Dynamic Banners
- Dynamic Landing Page
- FAQs Page
- Featured Products
- Filter Posts by Relationships
- Filter Posts by Taxonomy
- Full Site Editing
- Google Fonts
- Gutenberg
- Hotel Booking
- Latest Products
- Logo Carousel
- MB Builder Applications
- MB Group Applications
- MB Views Applications
- Most Viewed Posts
- Opening Hours
- OTA Website
- Pricing Table Page
- Product Page
- Product Variations
- Querying and Showing Posts by Custom Fields
- Recipe
- Related Posts via Relationship
- Restaurant Menus
- SEO Analysis
- Simple LMS
- Speed Up Website
- Taxonomy Thumbnails
- Team Members
- User Profile
- Video Gallery
 How to Create Download and Preview Buttons - P5 - Using Meta Box and Zion
  How to Create a Video Gallery Page - P6 - Using Meta Box and Zion
  How to Show Posts with Specific Criteria - P6 - Using Meta Box and Zion