
If you’re building a travel site or regional guides, adding a weather forecast widget will enhance user experience and make your site more attractive.
This guide shows you how to do it with the help of MB Views from Meta Box.

On it, the user can see the weather of the current day, some parameters, and the weather forecast for the next few days. Not only that, you can customize the data on the widget, such as changing the location, the forecast days, and the widget layout.
Video Version

Before Getting Started
All the information about the weather forecast, such as location, parameters, and others will be input and saved in custom fields created with Meta Box. And they’re on a settings page as a separate page for the weather. Then, display and style the data on the widget using MB Views.
So, I recommend you use Meta Box AIO to have both the framework and advanced features from Meta Box extensions. These are the extensions we use:
- MB Settings Page: to create a settings page for the weather forecast.
- MB Views: to get and display the weather forecast widget.
- MB Builder: to have UI in the backend to create custom fields visually.
- MB Conditional Logic: to set the rule for displaying fields.
Create a Settings Page and Custom Fields
We have some tutorials about how to do it, so you can follow them for more details. Here I’ve created them already, and assigned the field group to the settings page.
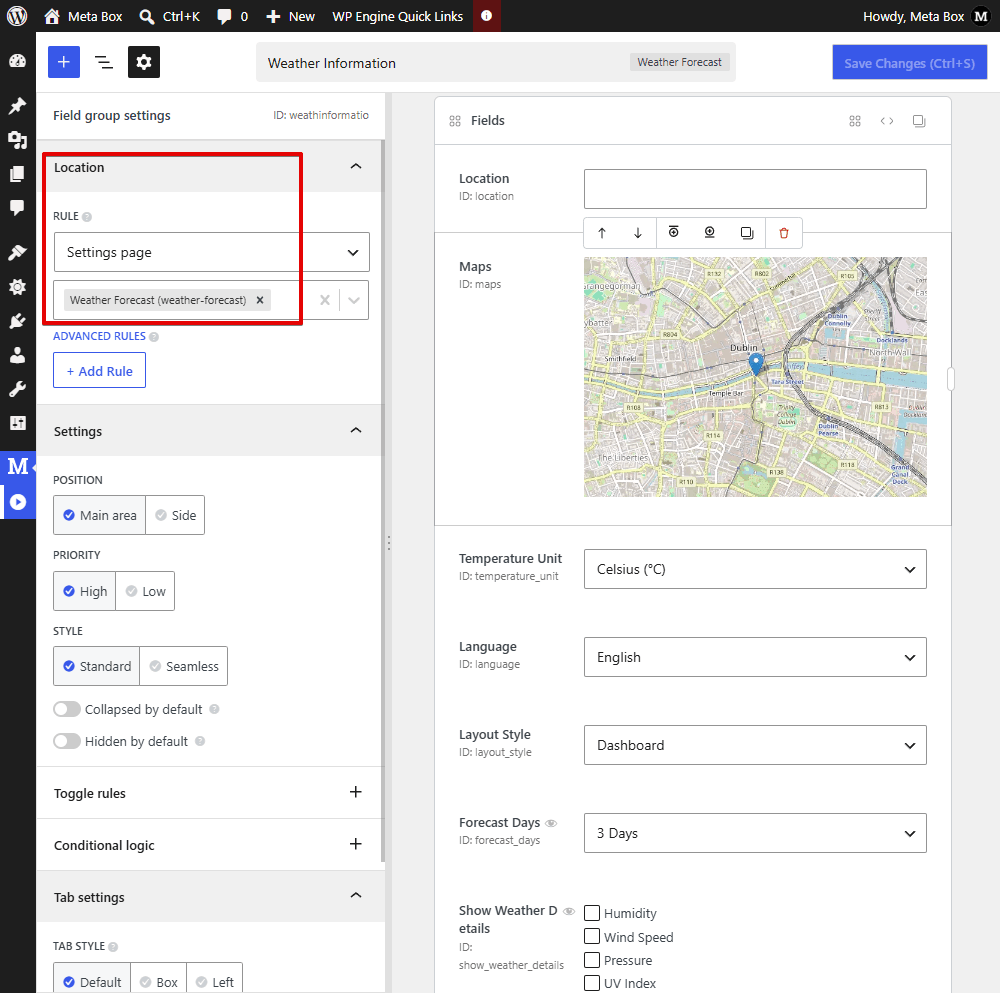
In there, I set the conditional logic for the field; this means it won’t be displayed when the widget layout is compact.

Notice that these fields are the basic information of the widget. The weather data is obtained from the Open-Meteo API automatically. This is a free weather API.
As a result, in the settings page, you can see that all the fields are ready for data input.

Show Weather Forecast Widget on a Page
As I mentioned at first, we’ll use MB Views to do it. So, navigate to the Views submenu in Meta Box, and create a new view.
Get and Display Data of the Widget
In the Template tab, you can add some code or use the Insert Field button to get data from fields.
Since the fields are on the settings page, go to the Site tab to insert the needed fields. The generated code will be added to the template tab immediately. You can also choose the output of some special fields like map.
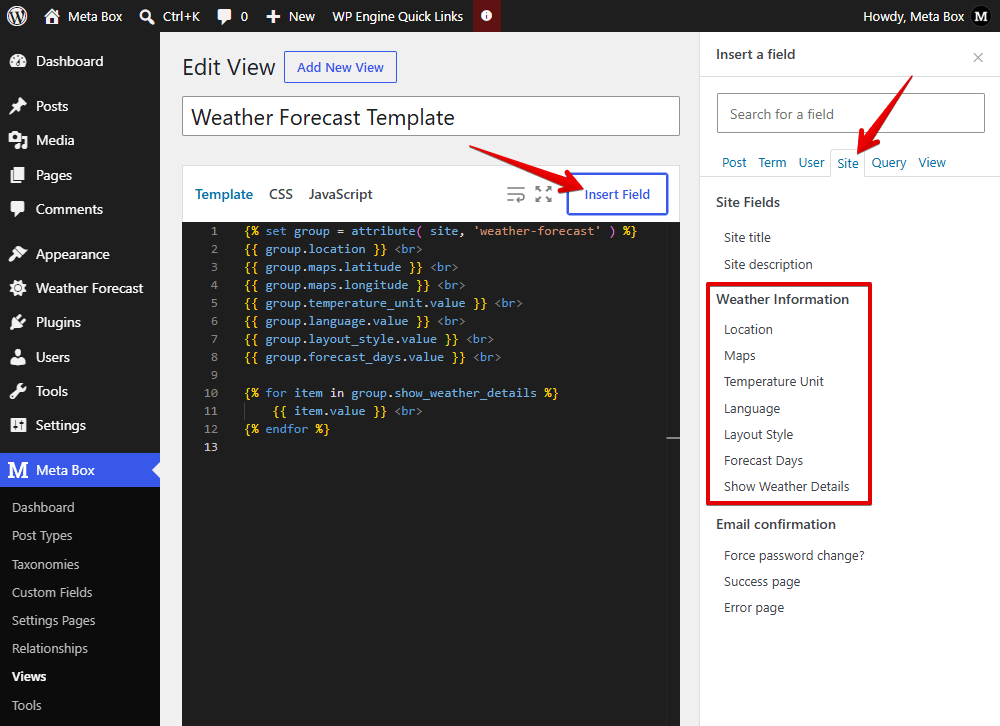
After inserting all the fields, in the Settings section, I keep the default setting of the type as Shortcode. Therefore, when you publish the view, a shortcode is generated.
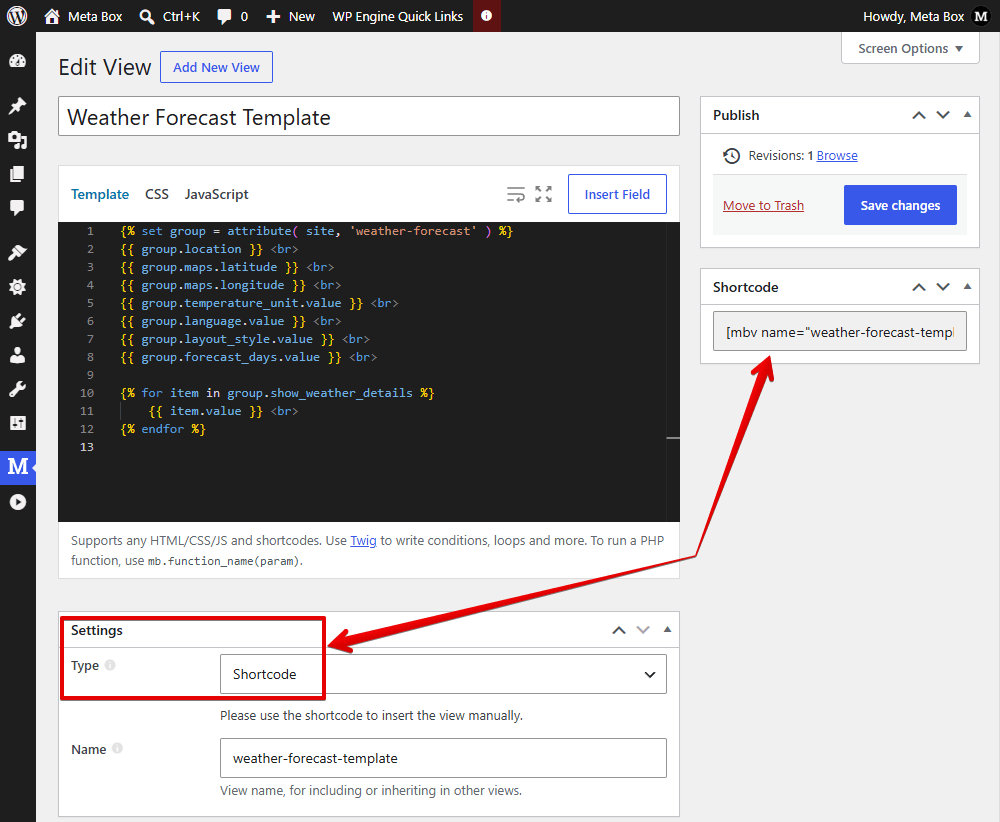
Just copy it, then paste it on the page where you want to display the weather widget, for example, I put it in the blog page. Then, on the frontend, all the weather data that is retrieved from the weather API is displayed. But it’s in text format only.

To style it, back to the created template and add some code.
In the Template tab, I modify code like this:

In there:
I use {% set weather_details = [] %} to create an empty array to save the weather details.
Then, I loop through the choices in the field that has the show_weather_details ID since each choice is a field value. As you can see, I modified the code inside this loop, to add values to the created array.
Next, assign data from the settings page to HTML data attributes. They will be used so that JavaScript can retrieve and use them through the weather API.
After that, move to the CSS tab to style the widget.
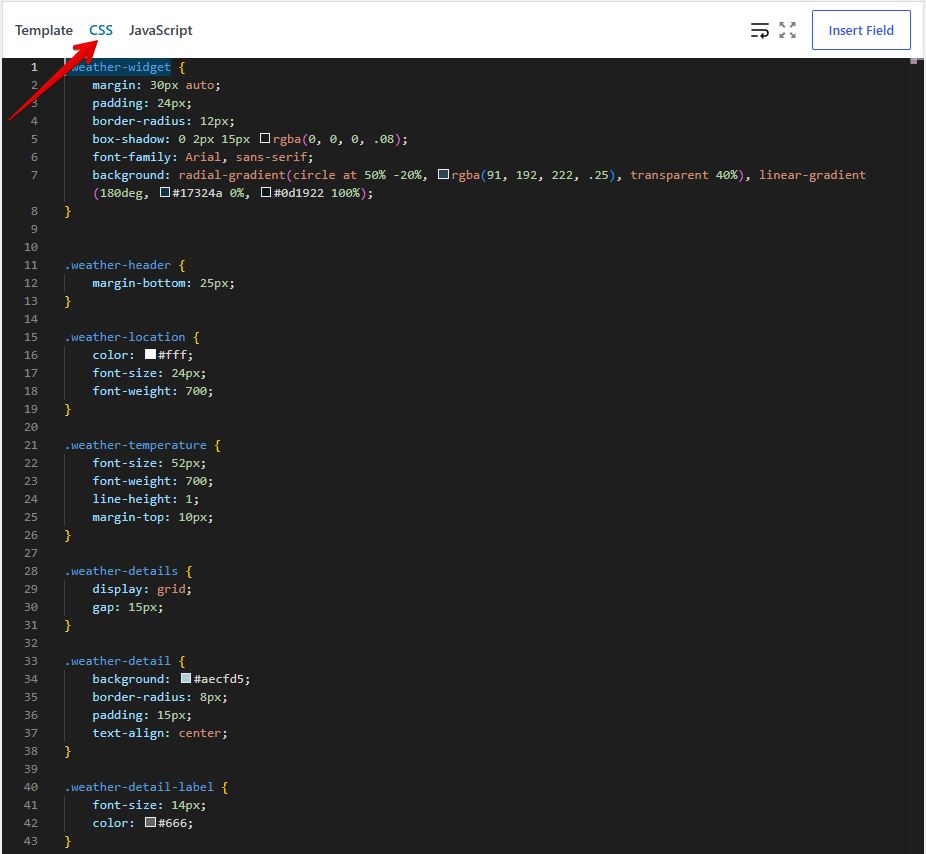
Transform Format and Add Actions for the Weather Forecast Widget
We need to use some JavaScript to create and display a weather widget, including getting weather data from the API, then rendering the appearance based on the options that we configured in custom fields.
So, navigate to the JavaScript tab, and add some code.

Let’s break down the code in detail.
document.addEventListener('DOMContentLoaded', () => {
    const widget = document.getElementById('weather-widget');
    if (!widget) return;
    const {
        lat,
        lng,
        location,
        days = 3,
        layout = 'dashboard',
        lang = 'en',
        unit,
        details = ''
    } = widget.dataset;
This part is to initialize a weather widget and get data from an HTML attribute that has this ID.
const color = '#2abf97';
const forecastDays = parseInt(days);
const selectedDetails = details ? details.split(',') : [];
const temperatureUnit =
    unit === 'fahrenheit' ? 'fahrenheit' : 'celsius';

const unitSymbol =
    unit === 'fahrenheit' ? '°F' : '°C';
This is to process the basic settings, define the widget's primary color, convert the forecast days from a string to an integer, and determine the appropriate temperature unit symbol.
const labels = {
    humidity: ['Humidity', 'Độ ẩm', 'Humidité', 'Luftfeuchtigkeit', 'Humedad'],
    wind: ['Wind', 'Gió', 'Vent', 'Wind', 'Viento'],
    pressure: ['Pressure', 'Áp suất', 'Pression', 'Luftdruck', 'Presión'],
    uv: ['UV Index', 'Chỉ số UV', 'Indice UV', 'UV-Index', 'Índice UV'],
    sunrise: ['Sunrise', 'Mặt trời mọc', 'Lever du soleil', 'Sonnenaufgang', 'Amanecer'],
    sunset: ['Sunset', 'Mặt trời lặn', 'Coucher du soleil', 'Sonnenuntergang', 'Atardecer'],
    forecast: ['Forecast', 'Dự báo', 'Prévisions', 'Vorhersage', 'Pronóstico'],
    loading: ['Loading weather...', 'Đang tải dữ liệu...', 'Chargement météo...', 'Wetter wird geladen...', 'Cargando clima...'],
    error: ['Unable to load weather data', 'Không thể tải dữ liệu', 'Impossible de charger la météo', 'Wetterdaten konnten nicht geladen werden', 'No se pudo cargar el clima'],
    aqi: ['Air Quality', 'Chất lượng không khí', 'Qualité de l’air', 'Luftqualität', 'Calidad del aire'],
    today: ['Today', 'Hôm nay', 'Aujourd’hui', 'Heute', 'Hoy']
};

const langs = ['en', 'vi', 'fr', 'de', 'es'];

const index = langs.includes(lang)
     ? langs.indexOf(lang)
    : 0;

const t = Object.fromEntries(
    Object.entries(labels).map(
        ([key, val]) => [key, val[index] || val[0]]
    )
);
I use this section to define all the text labels used in the widget and translates them into multiple languages, allowing the widget to display content based on the selected language. 'en', 'vi', 'fr', 'de', 'es' are the languages that the widget supports. In case you want to add another translation, just add that language here, then, add the translation for the corresponding labels.
widget.classList.add('weather-layout-' + layout);
const weatherMap = {
    0: ['☀️', 'Clear Sky'],
    1: ['🌤️', 'Mainly Clear'],
    2: ['⛅', 'Partly Cloudy'],
    3: ['☁️', 'Cloudy'],
    45: ['🌫️', 'Fog'],
    48: ['🌫️', 'Fog'],
    51: ['🌦️', 'Drizzle'],
    53: ['🌦️', 'Drizzle'],
    55: ['🌦️', 'Heavy Drizzle'],
    61: ['🌧️', 'Rain'],
    63: ['🌧️', 'Rain'],
    65: ['🌧️', 'Heavy Rain'],
    71: ['❄️', 'Snow'],
    73: ['❄️', 'Snow'],
    75: ['❄️', 'Heavy Snow'],
    80: ['🌦️', 'Rain Shower'],
    81: ['🌧️', 'Rain Shower'],
    82: ['🌧️', 'Heavy Shower'],
    95: ['⛈️', 'Thunderstorm'],
    96: ['⛈️', 'Thunderstorm'],
    99: ['⛈️', 'Severe Thunderstorm']
};
To have a more beautiful and visual interface, I use this part to set the code and icon for weather types.
const getWeatherInfo = code => {
    const [icon, label] = weatherMap[code] || ['🌤️', 'Weather'];
    return { icon, label };
};
We create a helper function that returns the corresponding weather icon and description based on the weather code provided by the API.
The next part is to retrieve forecast data from the weather API and the air quality data.
After retrieving all the data, I add a part to render it. Then, get both API for the weather and air quality.
Besides the forecast, I display the weather of the current day as well, by using this section:
const current = weatherData.current;
const daily = weatherData.daily;
const aqi = airData.current?.us_aqi ?? '-';
const weather = getWeatherInfo(current.weather_code);
const currentCard = `
<div class="weather-current">
    <div class="weather-icon">
        ${weather.icon}
    </div>
    <div class="weather-condition">
        ${weather.label}
    </div>
    <div class="weather-minmax">
        H: ${daily.temperature_2m_max[0]}${unitSymbol}
        /
        L: ${daily.temperature_2m_min[0]}${unitSymbol}
    </div>
    <div class="weather-aqi-inline">
        ${t.aqi}: ${aqi}
    </div>
</div>
let detailsHtml = '';
const detailItems = [
    ['humidity', t.humidity, `${current.relative_humidity_2m}%`],
    ['wind', t.wind, `${current.wind_speed_10m} km/h`],
    ['pressure', t.pressure, `${current.pressure_msl} hPa`],
    ['uv', t.uv, daily.uv_index_max[0]]
];

detailItems.forEach(([key, label, value]) => {
    if (selectedDetails.includes(key)) {
        detailsHtml += renderDetail(label, value);
    }
});
This is to display the selected parameters.
If you want to show the time of sunrise and sunset, you can use the next part.
Next, for the weather forecast list for 3,5 or 7 days, I use some code. They will include the day name, weather icon, and the max-min temperature.
Don’t forget to render the complete interface of the widget.
Finally, I add a part to handle API issues while fetching the weather data from API.
That’s all.
I uploaded the needed code to GitHub, so you can refer to it.
Now, on the frontend, we have a new appearance of the widget. When you change the widget settings, the output reflects your changes.
Last Words
That's how you can create a customizable weather forecast widget with Meta Box. By combining custom fields, the Open-Meteo API, and JavaScript, you can display real-time weather data and forecasts based on the location and options you choose.
You can also customize the widget further to fit your website's design and add more weather data or features as needed.
- MB Views: How To Display Relationships?
- How to Create Reusable Template Parts in WordPress
- How to Create YouTube Video Timestamps on WordPress Website - P1 - Using MB Views
- How to Randomize Hero Image in WordPress - Using MB Views
- How to Display a Video Playlist - Using MB Views
- How to Create a Reading Progress Bar in WordPress Posts - P1 - Using MB Views
- How to Create Reading Time to Your WordPress Posts - Using MB Views
- How to Add Code to Header and Footer in WordPress - Using MB Views
- How to Create Charts in Posts - Using MB Views
- How to Create a Dynamic Horizontal Posts Accordion - Using MB Views
- How to Manage & Display Course Schedule With Filters
- How to Create the Rating Feature for a WordPress Website - Using MB Views
- How to Create a Product Comparison Table - Using MB Views
- How to Search Posts on a Map - Using MB Views
- How to Create a Grid Layout for the Favourite Posts - Using MB Views
- How to Categorize Items in a Cloneable Group by Subfield Value - Using MB Views
- How to Create a Weather Forecast Widget - Using MB Views
- Advanced Map Listings
- Author Bio
- Better 404 Page
- Blogs for Developers
- Building a Simple Listing Website with Filters
- Building an Event Website
- Building Forms with MB Frontend Submission
- Coding
- Create a Chronological Timeline
- Custom Fields Fundamentals
- Design Patterns
- Displaying Posts with Filters
- Download and Preview Buttons
- Dynamic Banners
- Dynamic Landing Page
- FAQs Page
- Featured Products
- Filter Posts by Relationships
- Filter Posts by Taxonomy
- Full Site Editing
- Google Fonts
- Gutenberg
- Hotel Booking
- Latest Products
- Logo Carousel
- MB Builder Applications
- MB Group Applications
- MB Views Applications
- Most Viewed Posts
- Opening Hours
- OTA Website
- Pricing Table Page
- Product Page
- Product Variations
- Querying and Showing Posts by Custom Fields
- Recipe
- Related Posts via Relationship
- Restaurant Menus
- SEO Analysis
- Simple LMS
- Speed Up Website
- Taxonomy Thumbnails
- Team Members
- User Profile
- Video Gallery

 How to Create a Coming Soon Page with Countdown - P1 - Using MB Views
  How to Create a Custom 404 Page - P3 - Using MB Views
  MB Views vs. Dynamic Shortcodes: More Similarities than You Realized